


Along with the development of smartphones, mobile apps become more popular over the years from bank apps, to entertainment, business management, and more. Mobile developers are always seeking ways to increase user experience for their mobile app and deep linking is an effective method that helps them to achieve that. To implement deep linking, developers usually use Branch.io, a popular platform that allows them to manage and create deep links. In this article, we will explore the steps in configuring Branch.io for deep linking.
What is deep linking?
A Deep Link is a hyperlink that generally comes into play with mobile applications to navigate the user directly to a particular screen of content. Deep link helps users find the most suitable content and improve the user experience, providing smooth functionality.
This is in contrast to ordinary links that take you only to an app home page or a generic website, Deep links are mechanisms that bring users to a specific screen or functionality within the mobile app.

Recognize types of deep links.
There are many types of deep links, but we can divide them into 2 main types: Basic Deep Link and Deferred Deep Link.
Basic Deep Link: A basic deep link is a type of deep link that is used in mobile applications to send users directly to a specific screen/feature/content within an application. The usual basic deep links are in plain form and only need the essential details that point to the right place inside the mobile app.
Deferred Deep Link: A deferred deep link also takes users to particular content in a mobile application. However, it can handle extra data before redirecting.
How to set up Branch.io for deep linking in a React Native project.
Below are 5 steps for setting up deep links in a React Native project using Branch. However, you have to create a Branch.io account before implementing these steps.
1. Branch.io configuration
2. Install branch.io for deep linking
yarn add react-native-branchNote: The react-native-branch module requires your react-native version to be greater than or equal to 0.60
iOS App with CocoaPods
Step 1: Add the following code to your Podfile
    platform :ios, '11.0'

    target 'APP_NAME' do
      # if swift
      use_frameworks!

      pod 'react-native-branch', path: '../node_modules/react-native-branch'
    end
Step 2: Run the pod install command to regenerate Pods project with new dependencies
3. App Configuration in Branch Dashboard
For iOS configuration
Step 1: Configure Bundle identifier
- Search the bundle identifier of your project in Xcode, under the Signing & Capabilities tab
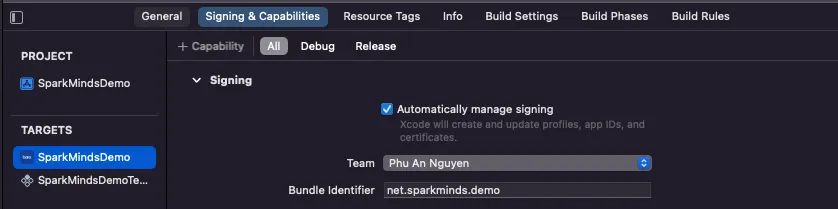
- Back to the Configuration page of the Branch Dashboard then select Add New Bundle ID

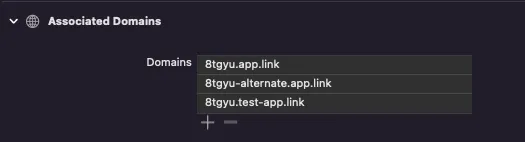
Step 2: Configure Associated domains
- In Branch Dashboard, go to Link Domain
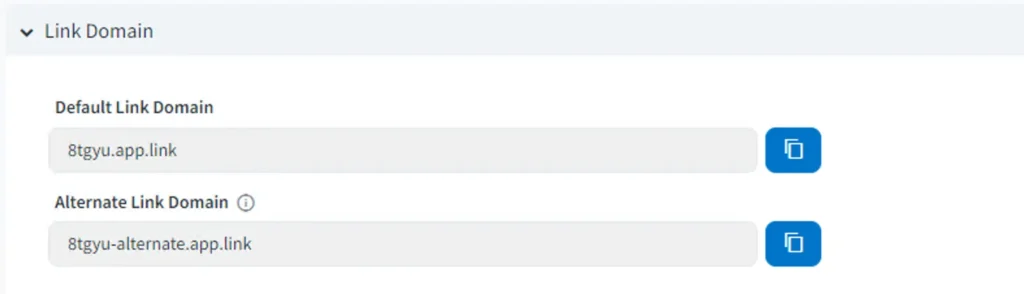
- Open Xcode and find Signing & Capabilities tab and add domains to your project
Step 3: Configure Info.plist file
<plist version="1.0">
	<dict>
		<key>branch_universal_link_domains</key>
		<array>
			<string>example.app.link</string> <!-- REPLACE `example.app.link` with your `app.link` domain -->
			<string>example-alternate.app.link</string> <!-- REPLACE `example-alternate.app.link` with your `-alternate` domain (required for proper functioning of App Links and Deepviews) -->
			<string>example.test-app.link</string> <!-- REPLACE `example.test-app.link` with your `test-app.link` domain -->
		</array>
		<key>CFBundleURLTypes</key>
		<array>
			<dict>
				<key>CFBundleTypeRole</key>
				<string>Editor</string>
				<key>CFBundleURLSchemes</key>
				<array>
					<string>branchsters</string>
				</array>
				<key>CFBundleURLName</key>
				<string>io.Branch.Branchsters</string>
			</dict>
		</array>
		<key>branch_key</key>
		<dict>
			<key>live</key>
			<string>key_live_aaa000AAA</string> <!-- REPLACE `BranchKey` with the value from your Branch Dashboard -->
			<key>test</key>
			<string>key_test_bbb000BBB</string> <!-- REPLACE `BranchKey.test` with the value from your Branch Dashboard -->
		</dict>
	</dict>
</plist>
Step 4: Add branch.json file to the project
- Create an empty file named branch.json
- Add that file to Xcode
For Android configuration
Step 1: Add dependencies
- Attach maven to build.gradle file
allprojects {
    repositories {
       maven { url 'https://maven.google.com/' }
    }
}- Add implementations to app/build.gradle file
    implementation "com.google.android.gms:play-services-ads-identifier:18.0.1"
    implementation "com.android.installreferrer:installreferrer:2.2"
Step 2: Configure AndroidManifest.xml
<?xml version="1.0" encoding="utf-8"?>
<manifest
	xmlns:android="http://schemas.android.com/apk/res/android"
    package="com.example.android">
	<uses-permission android:name="android.permission.INTERNET" />
	<uses-permission android:name="com.google.android.gms.permission.AD_ID"/>
	<application
      		android:allowBackup="true"
      		android:name="com.example.android.CustomApplicationClass"
      		android:icon="@mipmap/ic_launcher"
      		android:label="@string/app_name"
      		android:supportsRtl="true"
      		android:theme="@style/AppTheme">
		<!-- Launcher Activity to handle incoming Branch intents -->
		<activity
        		android:name=".LauncherActivity"
        		android:launchMode="singleTask"
        		android:label="@string/app_name"
        		android:theme="@style/AppTheme.NoActionBar"
        		android:exported="true">

			<intent-filter>
				<action android:name="android.intent.action.MAIN" />
				<category android:name="android.intent.category.LAUNCHER" />
			</intent-filter>

			<!-- Branch URI Scheme -->
			<intent-filter>
				<!-- If utilizing $deeplink_path please explicitly declare your hosts, or utilize a wildcard(*) -->
				<!-- REPLACE `android:scheme` with your Android URI scheme -->
				<data android:scheme="yourapp" android:host="open" />
				<action android:name="android.intent.action.VIEW" />
				<category android:name="android.intent.category.DEFAULT" />
				<category android:name="android.intent.category.BROWSABLE" />
			</intent-filter>

			<!-- Branch App Links - Live App -->
			<intent-filter android:autoVerify="true">
				<action android:name="android.intent.action.VIEW" />
				<category android:name="android.intent.category.DEFAULT" />
				<category android:name="android.intent.category.BROWSABLE" />
				<!-- REPLACE `android:host` with your `app.link` domain -->
				<data android:scheme="https" android:host="example.app.link" />
				<!-- REPLACE `android:host` with your `-alternate` domain (required for proper functioning of App Links and Deepviews) -->
				<data android:scheme="https" android:host="example-alternate.app.link" />
			</intent-filter>

			<!-- Branch App Links - Test App -->
			<intent-filter android:autoVerify="true">
				<action android:name="android.intent.action.VIEW" />
				<category android:name="android.intent.category.DEFAULT" />
				<category android:name="android.intent.category.BROWSABLE" />
				<data android:scheme="https" android:host="example.test-app.link" />
				<!-- REPLACE `android:host` with your `-alternate` domain (required for proper functioning of App Links and Deepviews) -->
				<data android:scheme="https" android:host="example-alternate.test-app.link" />
			</intent-filter>
		</activity>

		<!-- Branch init -->
		<!-- REPLACE `BranchKey` with the value from your Branch Dashboard -->
		<meta-data android:name="io.branch.sdk.BranchKey" android:value="key_live_XXX" />
		<!-- REPLACE `BranchKey.test` with the value from your Branch Dashboard -->
		<meta-data android:name="io.branch.sdk.BranchKey.test" android:value="key_test_XXX" />
		<!-- Set to `true` to use `BranchKey.test` -->
		<meta-data android:name="io.branch.sdk.TestMode" android:value="false" />

	</application>
</manifest>
Step 3: Add branch.json to your project
- Create an empty file named branch.json
- Add it to the src/main/assets folder of the app
4. Initialize Branch.io for deep linking
For IOS
Attach Branch to AppDelegate file
#import "AppDelegate.h"
#import <RNBranch/RNBranch.h>

@implementation AppDelegate

- (BOOL)application:(UIApplication *)application didFinishLaunchingWithOptions:(NSDictionary *)launchOptions
{
    // [RNBranch useTestInstance];
    [RNBranch initSessionWithLaunchOptions:launchOptions isReferrable:YES];
    NSURL *jsCodeLocation;
    //...
}

- (BOOL)application:(UIApplication *)app openURL:(NSURL *)url options:(NSDictionary<UIApplicationOpenURLOptionsKey,id> *)options {
  [RNBranch application:app openURL:url options:options];
  return YES;
}

- (BOOL)application:(UIApplication *)application continueUserActivity:(NSUserActivity *)userActivity restorationHandler:(void (^)(NSArray<id<UIUserActivityRestoring>> * _Nullable))restorationHandler {
  [RNBranch continueUserActivity:userActivity];
  return YES;
}

@end
For Android
- Add Branch to the MainApplication.kt file
import io.branch.rnbranch.*

// ...

override fun onCreate() {
    super.onCreate()
    RNBranchModule.getAutoInstance(this)

    SoLoader.init(this, false)
    if (BuildConfig.IS_NEW_ARCHITECTURE_ENABLED) {
        // If you opted-in for the New Architecture, we load the native entry point for this app
        load()
    }

    RNBranchModule.enableLogging();

    ReactNativeFlipper.initializeFlipper(this, reactNativeHost.reactInstanceManager)
}

// ...- Add Branch to the MainActivity.kt file
import io.branch.rnbranch.*
import android.content.Intent
// ...
override fun onStart() {
super.onStart()
RNBranchModule.initSession(getIntent().getData(), this)
}
override fun onNewIntent(intent: Intent?) {
super.onNewIntent(intent)
setIntent(intent)
RNBranchModule.reInitSession(this)
}
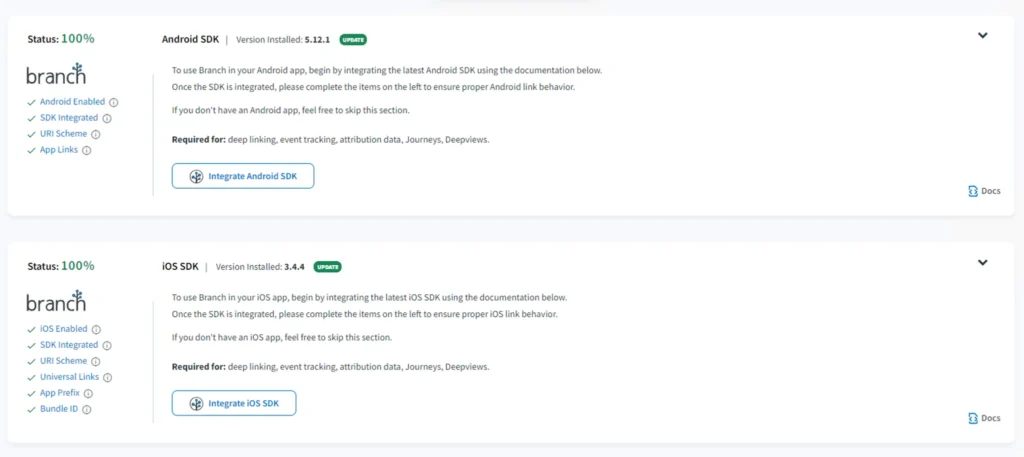
// ...5. Validate Branch integration
Make sure that the status of both the Android SDK and iOS SDK is fully 100% on Branch Dashboard
Guideline for validate Branch integration on iOS SDK
Add the following validateSDKIntegration() code snippet to the AppDelegate file
[[Branch getInstance] validateSDKIntegration];This function ensures that your Branch.io keys, package name, URI schemes, Universal Links, and link domain configured on Branch match the settings in your app.
Check the log in Xcode and assure that all SDK checks pass.
- Checking for URI scheme correctness … Passed
- Checking for bundle identifier correctness … Passed
- Checking for iOS Team ID correctness … Passed
Note: Don’t forget to remove that function when you release the app
Guideline for validate Branch integration on android SDK
Attach these code snippets below to the MainActivity’s file
import io.branch.referral.validators.IntegrationValidator

...

override fun onStart() {
    super.onStart()
    RNBranchModule.initSession(getIntent().getData(), this)
    IntegrationValidator.validate(this) <--- this code --->
  }
This function ensures that your Branch keys, package name, URI schemes, Universal Links, and link domain configured on Branch match the settings in your app.
Check the adb log cat and assure that all SDK checks pass.
- Verifying Branch instance creation … Passed
- Checking Branch keys … Passed
- Verifying application package name … Passed
- Checking Android Manifest for URI based deep link config … Passed
- Verifying URI based deep link config with Branch dash board. … Passed
- Verifying intent for receiving URI scheme. … Passed
- Checking AndroidManifest for AppLink config. … Passed
- Verifying any supported custom link domains. … Passed
- Verifying default link domains integrations. … Passed
- Verifying alternate link domains integrations. … Passed
Those are all steps for deep linking with the Branch.io configuration, I hope that you can follow this guideline and successfully build deep links for your own React Native project. In case, you have a tough mobile app project, you can learn more about our mobile app development service and contact us. We are happy to help you out!