Data Warehouse Overview
What is data warehouse?
A data warehouse is a system specifically designed to store, query, and analyze massive amounts of data, typically in range of terabytes (TB) or more.
Why is it necessary to implement a Data Warehouse in a project?
A data Warehouse is crucial for improving performance and managing data effectively in projects, especially as the amount of information increases. Databases often can’t keep up with the long-term storage and analysis needs of larger datasets.
What are the limitations of a database?
Direct interaction with user applications: Databases are usually built to support operational applications, ensuring users have a smooth experience. However, when we start storing large amounts of data—especially historical data like customer transactions—it can affect the database’s performance. For instance, if an application runs for 10 or 20 years without removing any information, the data volume can balloon, which slows everything down.
Requirements for reporting and data analysis: Businesses often require information such as transactions and business activities to be compiled into periodic reports for monitoring, analysis, and strategy development. This not only increases the volume of stored data but also affects performance when the database has to handle complex tasks like data aggregation and analysis.
This creates two major issues:
- The amount of data increases without directly serving users.
- Performance degrades when the database has to execute complex analytical queries, impacting the user experience.
Solution: Applying the Data Warehouse
A Data Warehouse is a specialized system designed for storing, querying, and analyzing large amounts of data. It allows you to separate data that doesn’t directly interact with users—like historical data or regular reports—from the main database. This separation brings several key benefits:
- Optimized performance: The database can focus solely on serving queries from applications, which helps maintain speed and high performance, ensuring a seamless user experience.
- Effective data analysis: The Data Warehouse creates a perfect environment for tackling complex analytical tasks without interrupting the main system’s operations. This way, businesses can easily generate reports, spot trends, and make informed strategic decisions without worrying about slowing down their systems.
Objectives of the guide
- To transfer data that needs to be separated from the Database to the Data Warehouse.
- To effectively generate periodic reports and store the reports in the Data Warehouse.
Technology used:
Database: MySQL
Data Warehouse: Google BigQuery
Language Service: Java
Overview of Implementation
Objective 1: To transfer data that needs to be separated from the Database to the Data Warehouse.
This guide will walk you through two methods for moving data from a MySQL database to Google BigQuery:
- Using a Java Application: You can create a Java application that uses the Google BigQuery library to upload data to the Data Warehouse.
- Using Google Data Stream: You can take advantage of Google Cloud’s Data Stream feature to automate the process of transferring data between MySQL and BigQuery.
Objective 2: To effectively generate periodic reports and store the reports in the Data Warehouse.
This guide will cover two methods for creating reports and saving the results in BigQuery:
- Using a Java Application: Build a Java application to run queries, gather data from BigQuery, and save the report results.
- Using Scheduled Query của BigQuery: Take advantage of BigQuery’s Scheduled Query feature to automate the regular periodic of reports.
Implementation tutorial
Setup the environment on Google BigQuery:
1. Go to the Google Cloud Console homepage via the link below.
https://console.cloud.google.com/
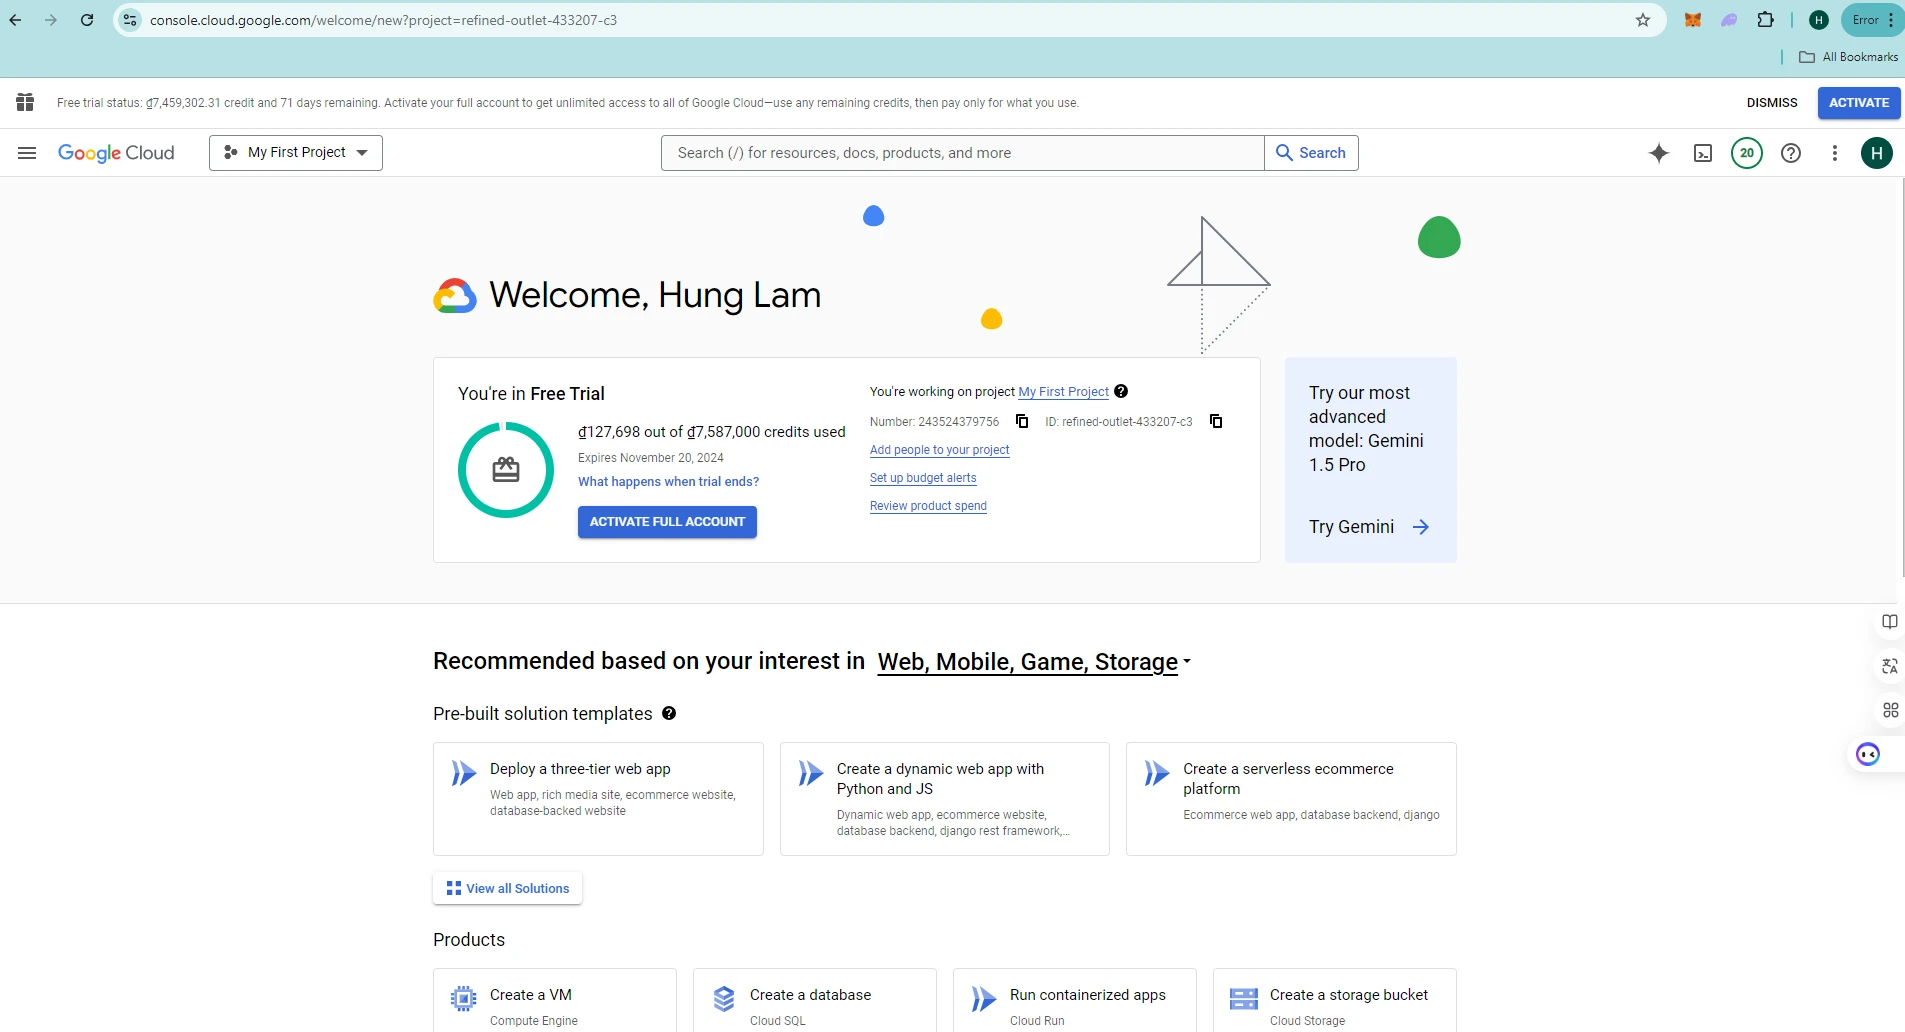
2. Create a new project for you application

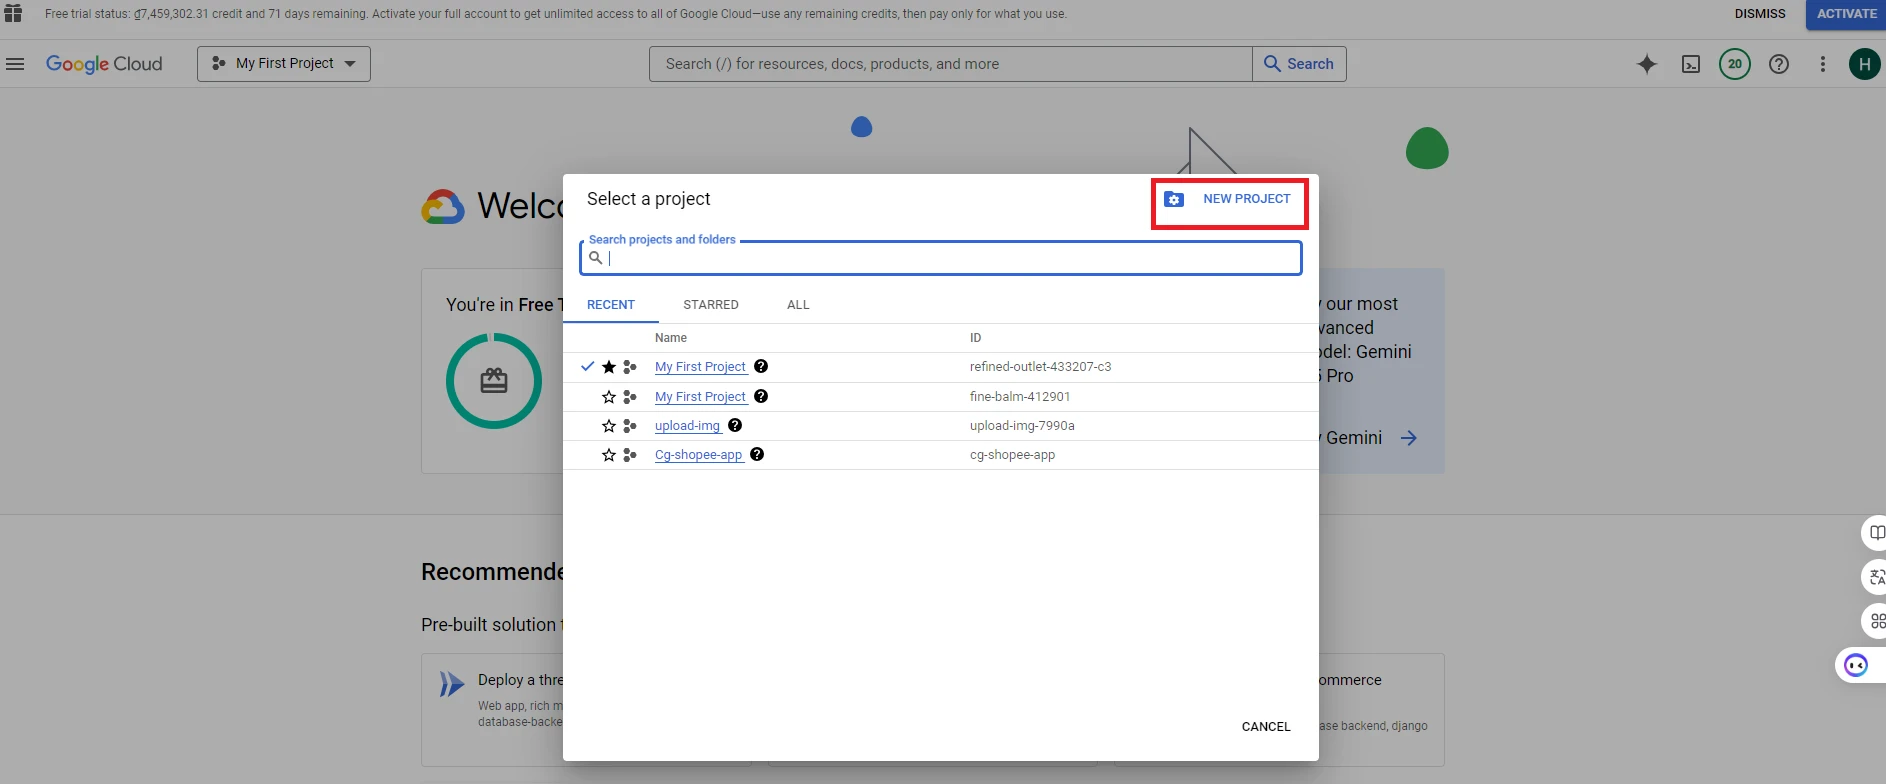
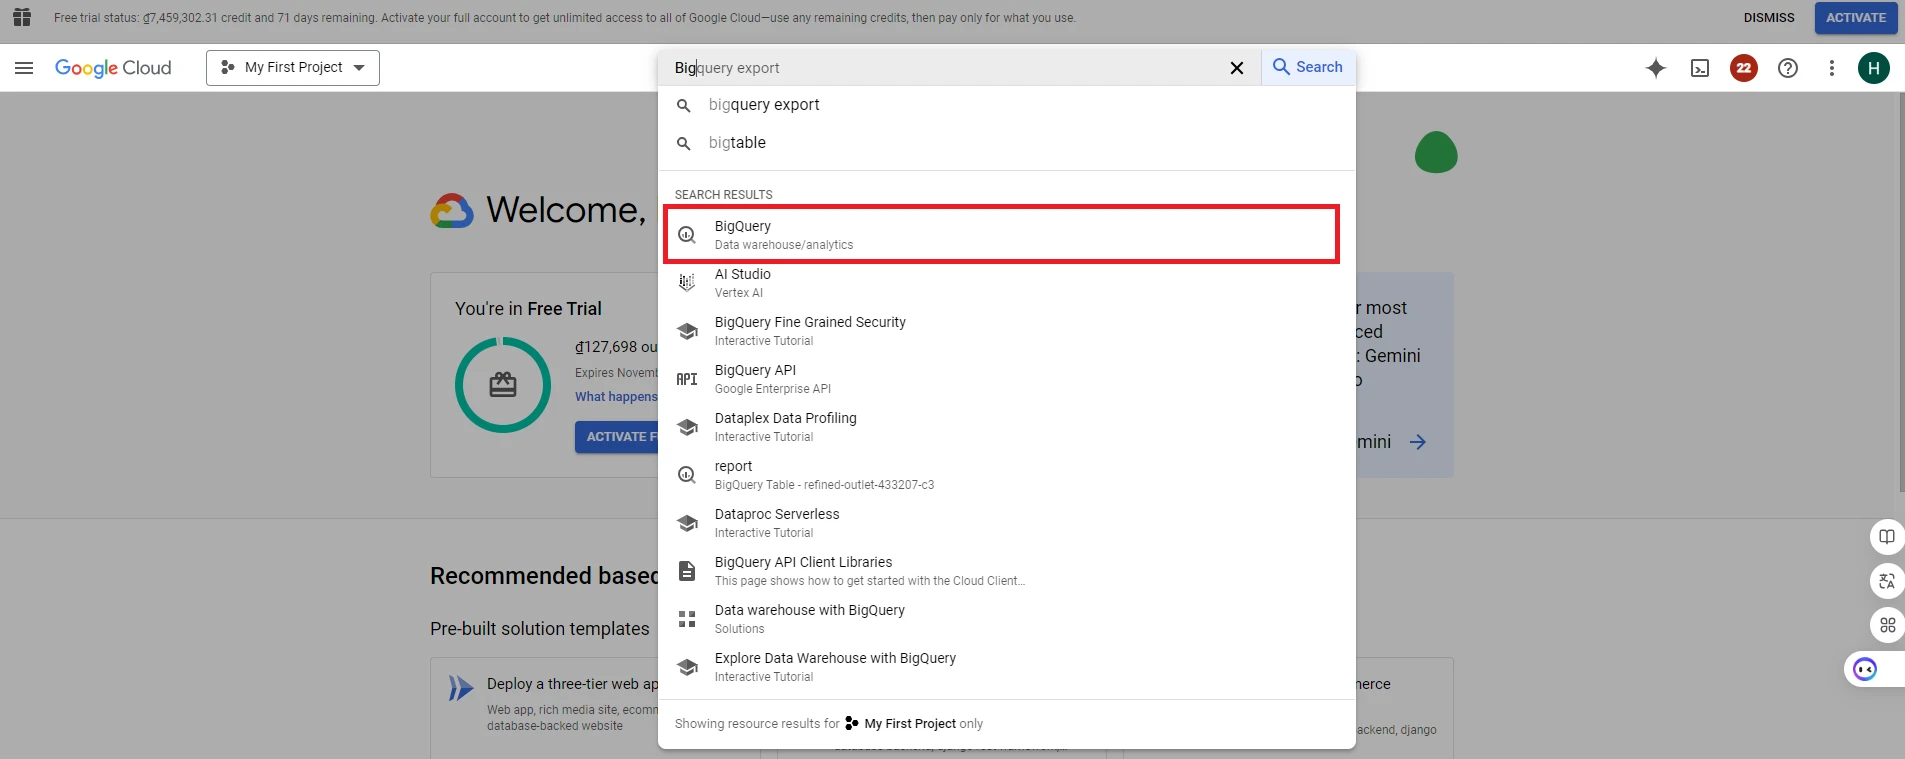
3. After creating and selecting a project, go to the search bar and type ‘BigQuery’
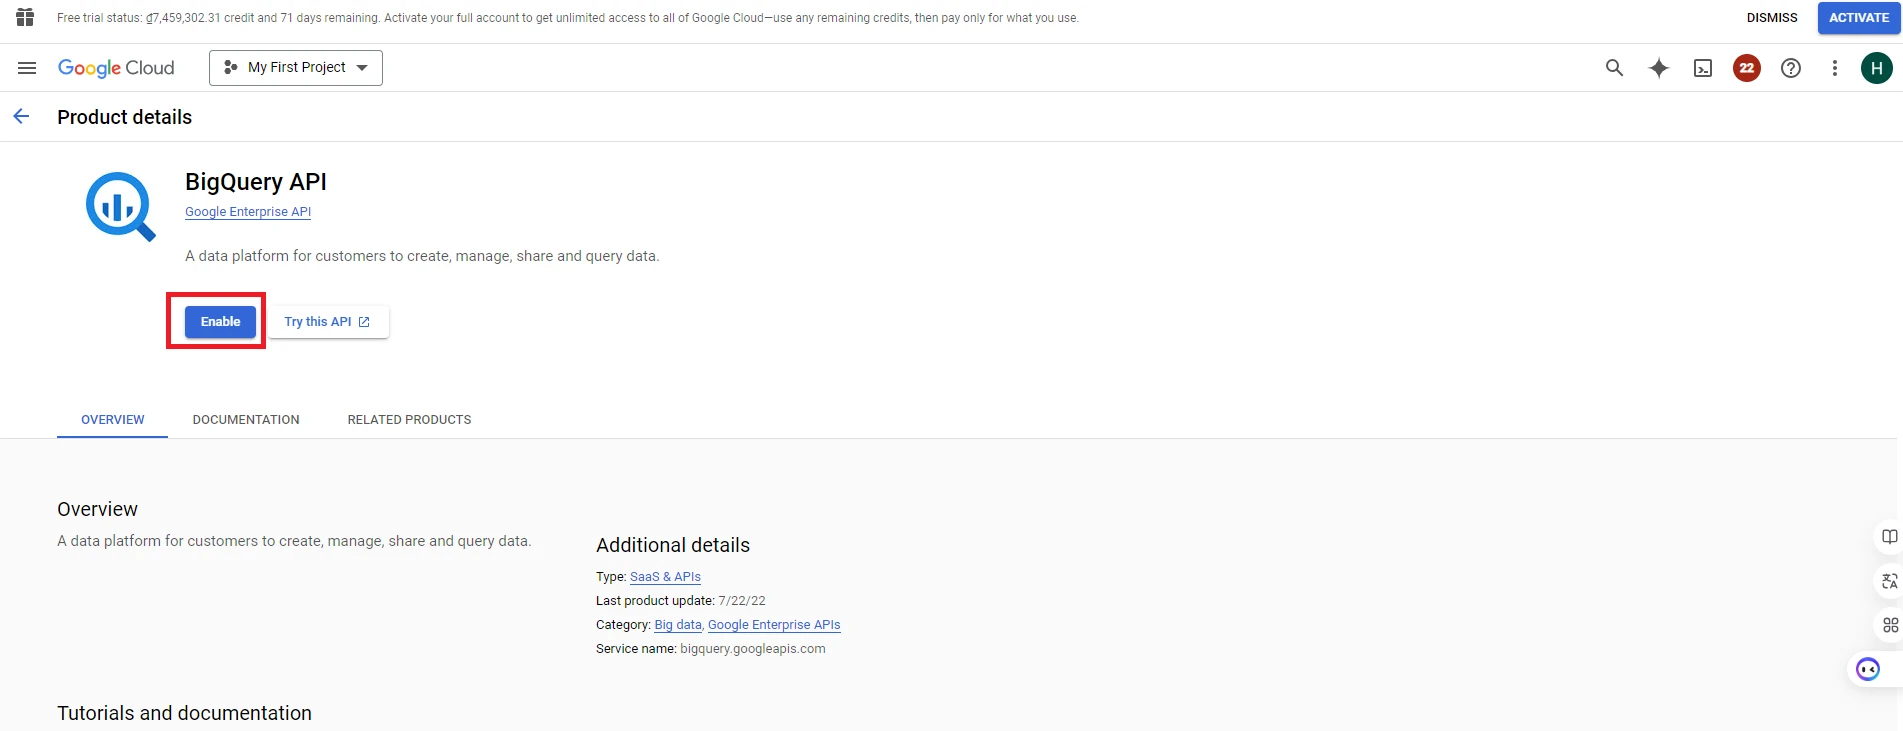
4. After accessing the BigQuery page, click ‘Enable’ to activate the Google BigQuery API. (When you want to use a specific feature of Google Cloud, you need to enable its API so that your application can connect to that feature’s API)
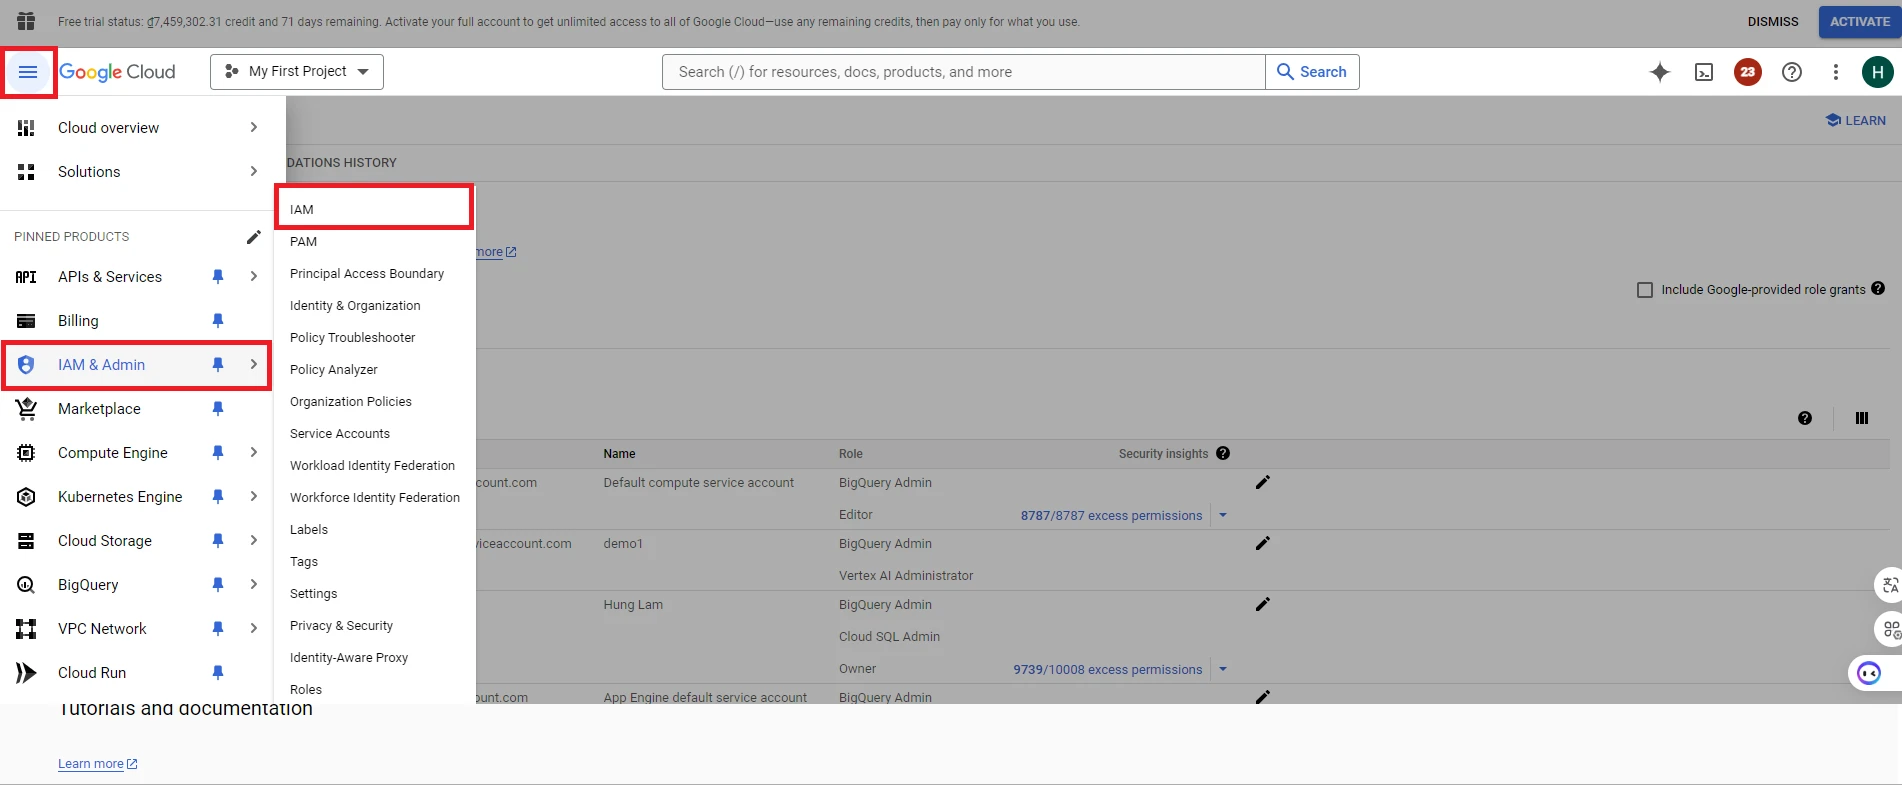
5. After enabling BigQuery API, next you need to grant permissions to work with BigQuery for the account you will use for the application. Click Navigation menu => Select ‘IAM & Admin’ section => Select ‘IAM’ (Identity and Access Management)
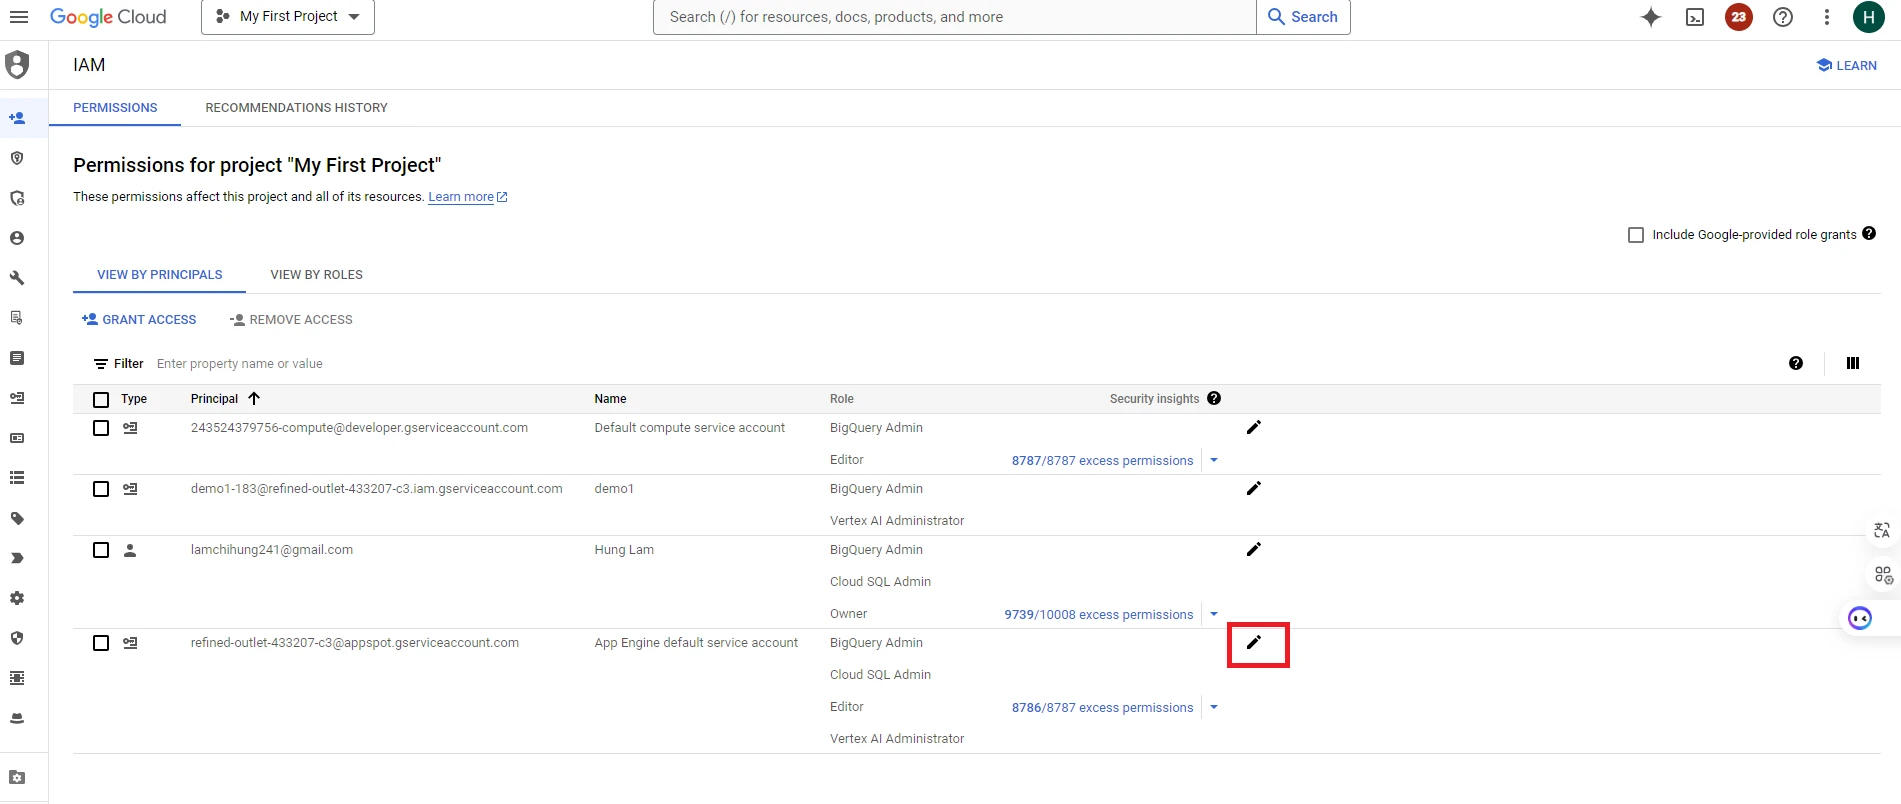
6. Select the account you want to edit to grant permissions for working with the BigQuery API
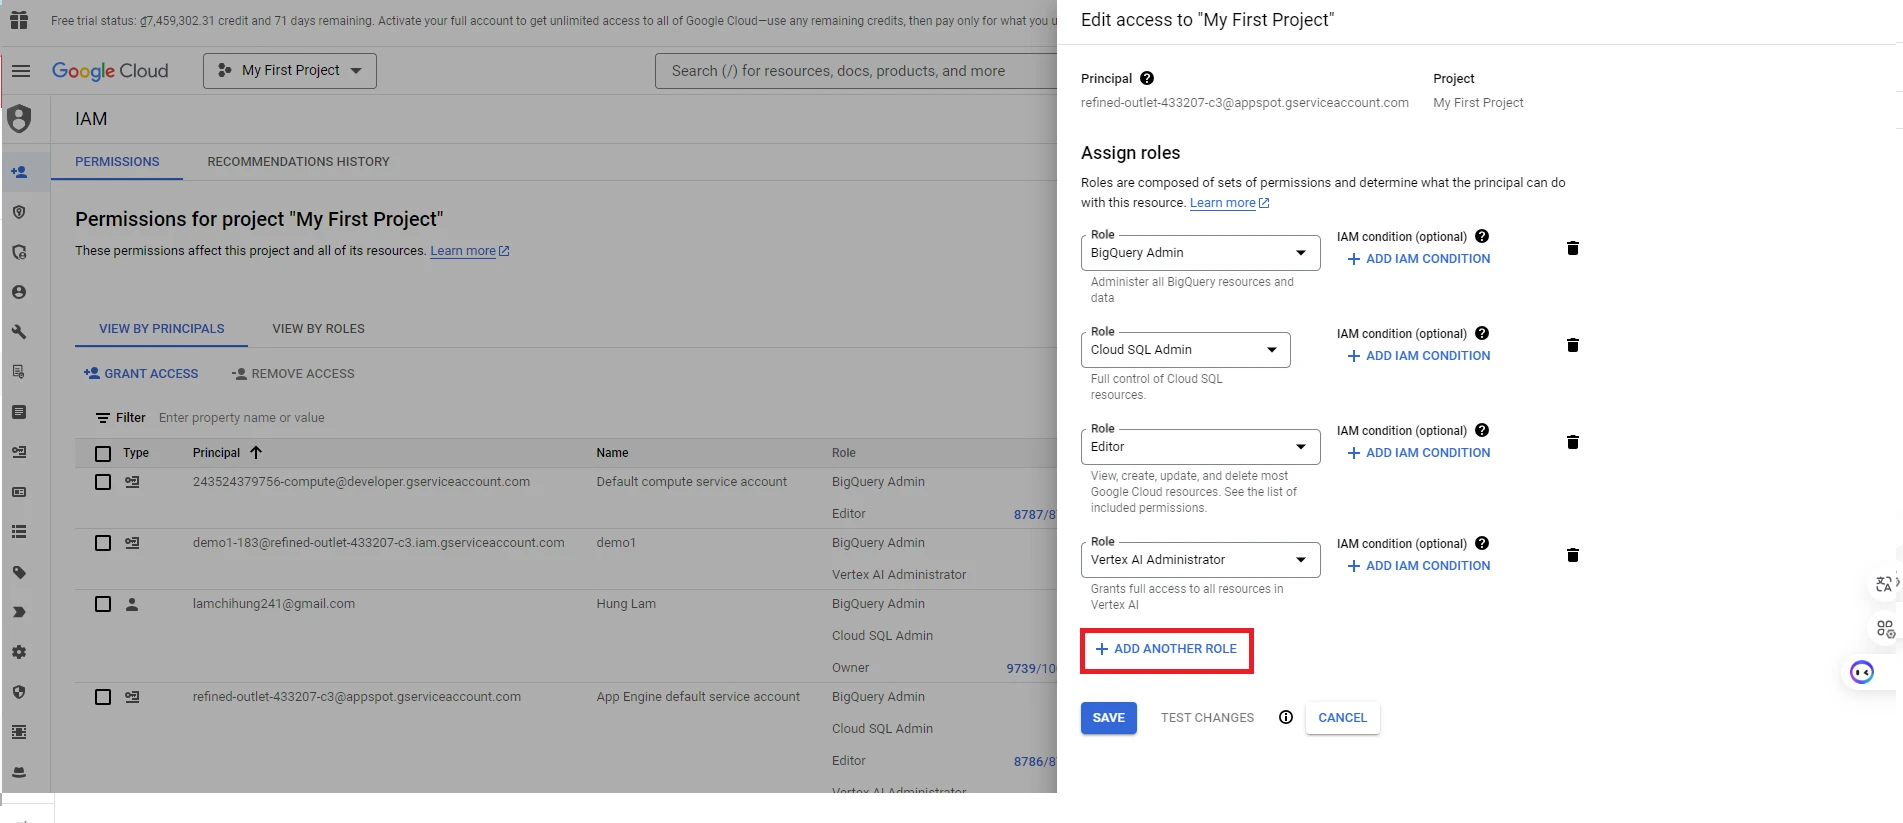
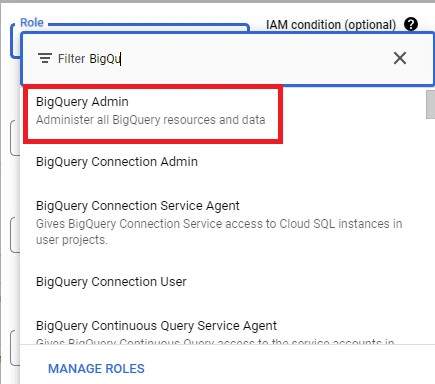
7. Then click ‘ADD ANOTHER ROLE’ => Click Role BigQuery Admin for your account
8. Next, we need to download the keys for the account to create Google Credentials in the application. Click Navigation menu => Select ‘IAM & Admin’ section => Select ‘Service Accounts’
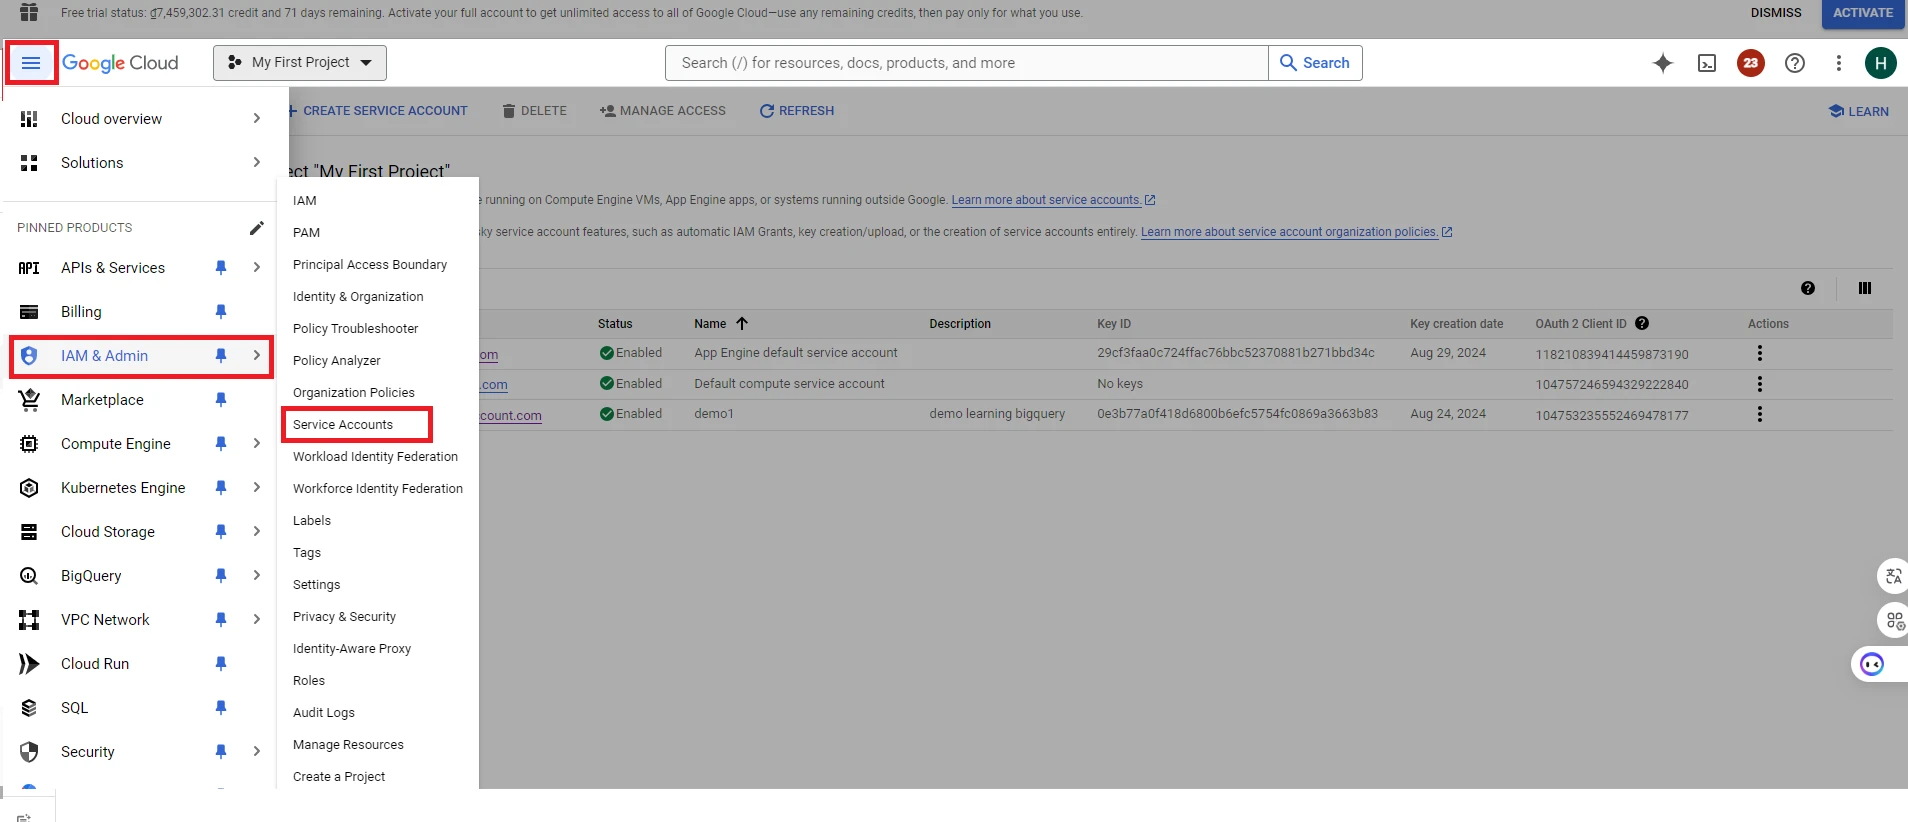
9. Select the account for which you granted the ‘BigQuery Admin’ role in the previous step

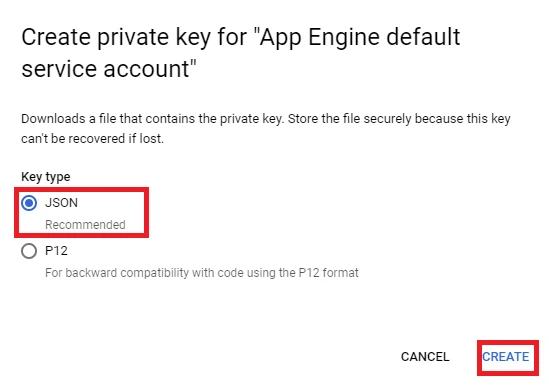
10. Click ‘KEYS’ => Select ‘ADD KEY’ => Select ‘Create new key’ => Choose JSON key type => Select ‘Create’. At this point, Google will automatically download the JSON key to your computer


Create Dataset in Google BigQuery (corresponding to the Schema in the Database)
1. Go back to BigQuery, here you will see the resource for the project you created. Select ‘create dataset’ to create dataset in Bigquery. Fill the information in the ‘Create dataset’ table:
- Dataset ID: Your dataset’s unique identifier.
- Location type: Choose the location for storing your dataset (This affects quote limits [number of API requests] and costs)
Then click ‘CREATE DATASET’
2. After creating the dataset, we continue to create a table within the dataset (corresponding to a table in the database)
3. Fill in the information in the ‘Create table’ table
- Table: Name of the table, e.g. transaction, report, etc.
- Schema: Create columns in the table
- Partitioning and cluster settings: Select the column you want to use for partitioning and clustering order
You’ve successfully set up the environment on Google BigQuery! Now, let’s move on to the next steps to help you achieve your objectives!
Using a Java Application to transfer data from the Database to BigQuery and query data from BigQuery back to a Java Application.
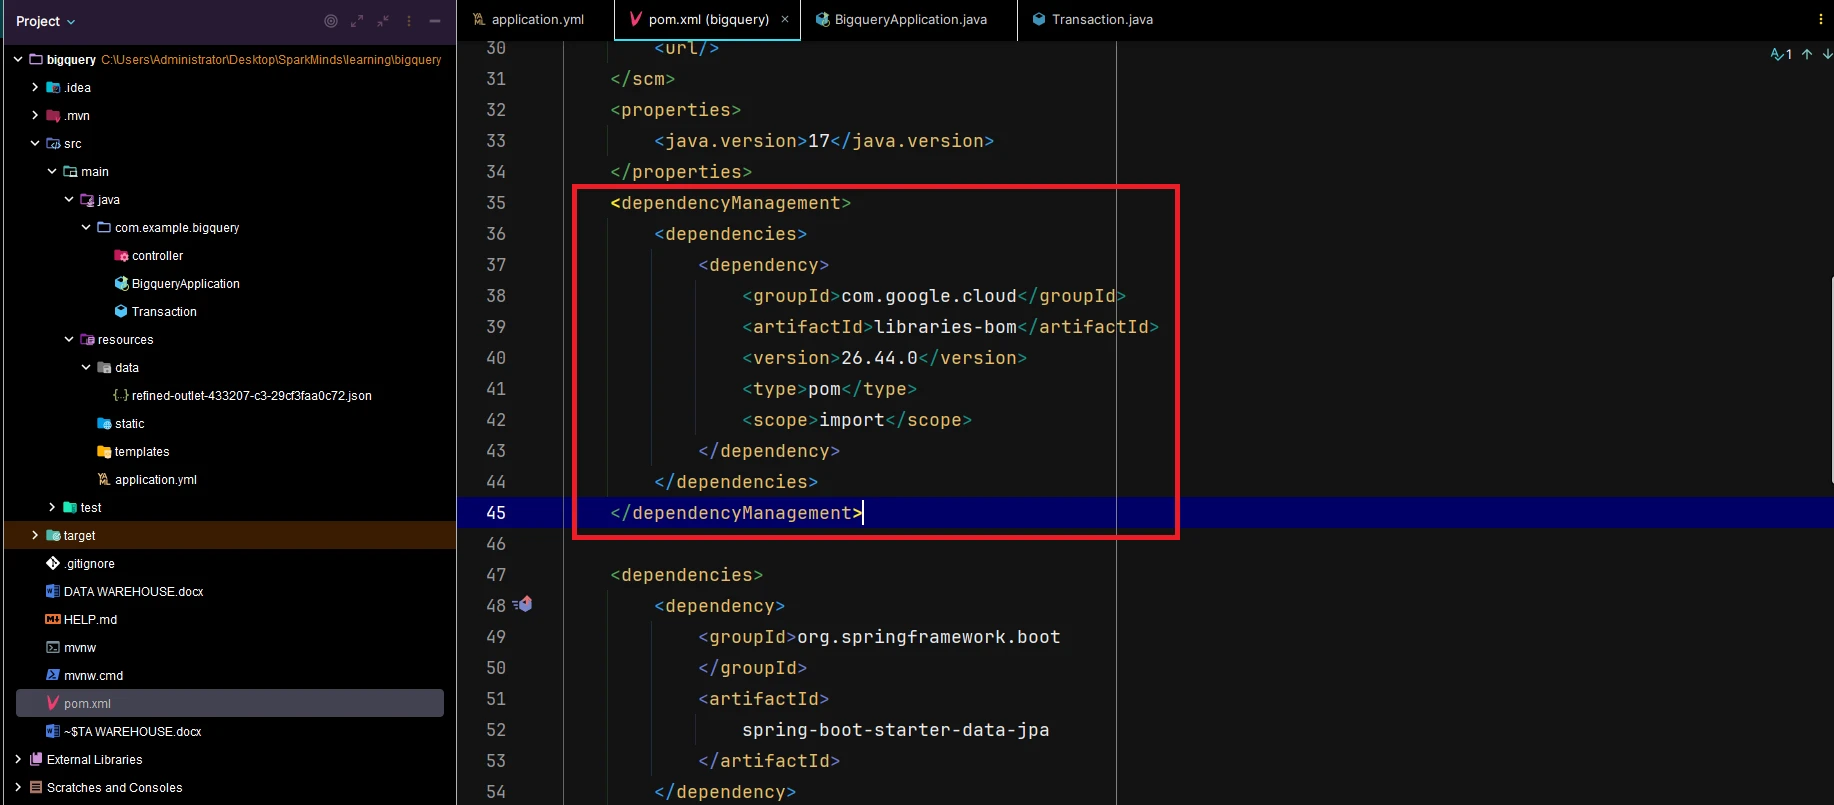
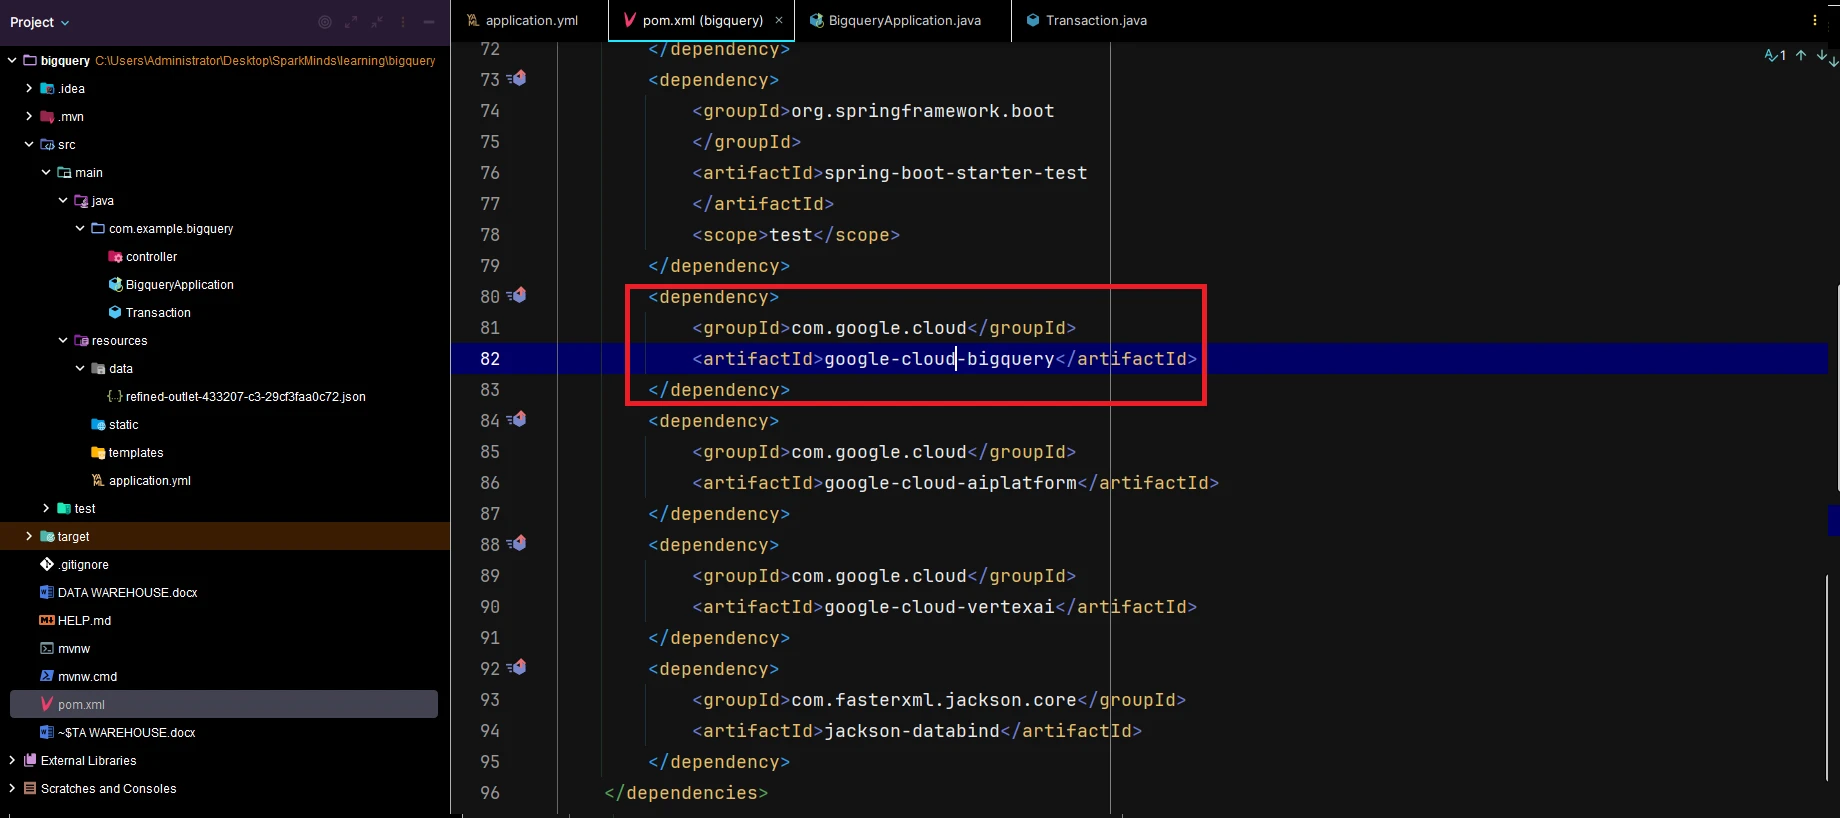
1. Open the pom.xml file and add dependencies from Google BigQuery
2. Save the details of the project, dataset, and table that need to be interacted with in BigQuery
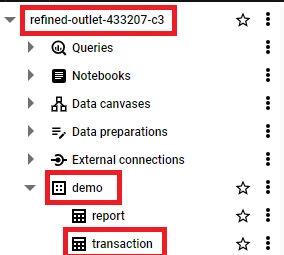

3. Configure Google Credential and Project
This is the path to the downloaded JSON key file.

4. Query data from the Database (This guide will only mock the data)
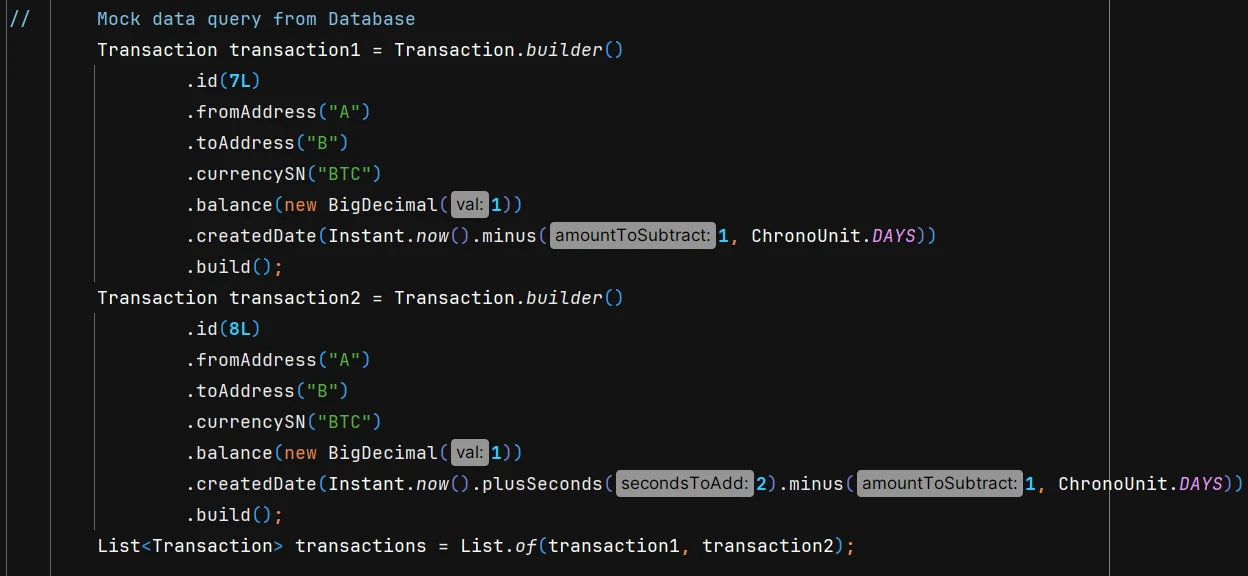
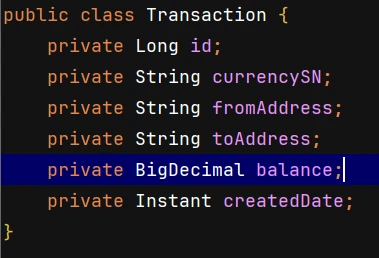
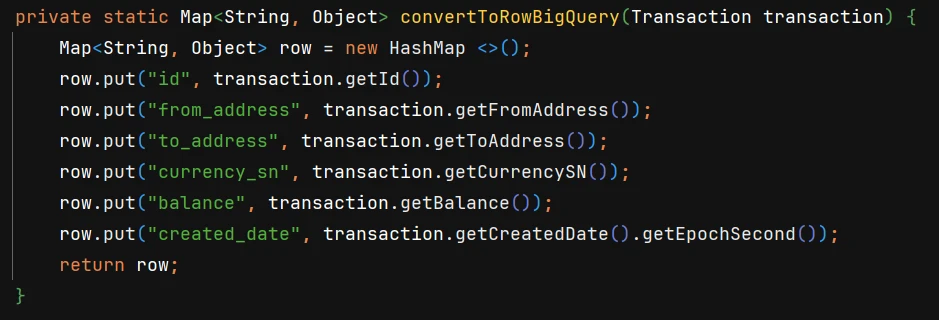
5. Convert the data into Google BigQuery’s RowToInsert object

6. Insert the data into BigQuery


You have now completed the function of transferring data from the Database to the Data Warehouse using a Java Application. Next, you will implement the functionality to query data from BigQuery
7. Create a query

8. Create a BigQuery job from the query and execute it

9. Check for any errors and display the results received.
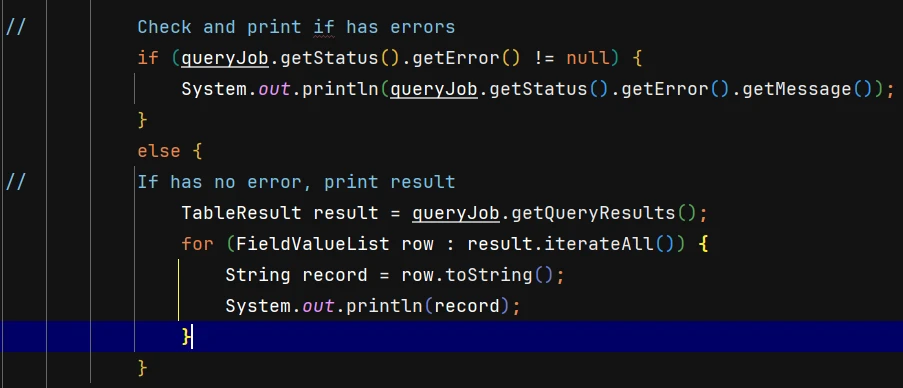

Example Result:
[
FieldValue{attribute=PRIMITIVE, value=1},
FieldValue{attribute=PRIMITIVE, value=BTC},
FieldValue{attribute=PRIMITIVE, value=A},
FieldValue{attribute=PRIMITIVE, value=B},
FieldValue{attribute=PRIMITIVE, value=1},
FieldValue{attribute=PRIMITIVE, value=1725718844.0}
]
You’ve now finished setting up the process for querying data from BigQuery using a Java Application. Next, we’ll walk you through how to transfer data from the Database to BigQuery and generate regular reports—without needing a Java Application.
Using DataStream to transfer data from the Database to BigQuery
Datastream for BigQuery is a Google Cloud service that allows you to replicate data from relational databases, such as MySQL, PostgreSQL, Oracle, and others, into BigQuery
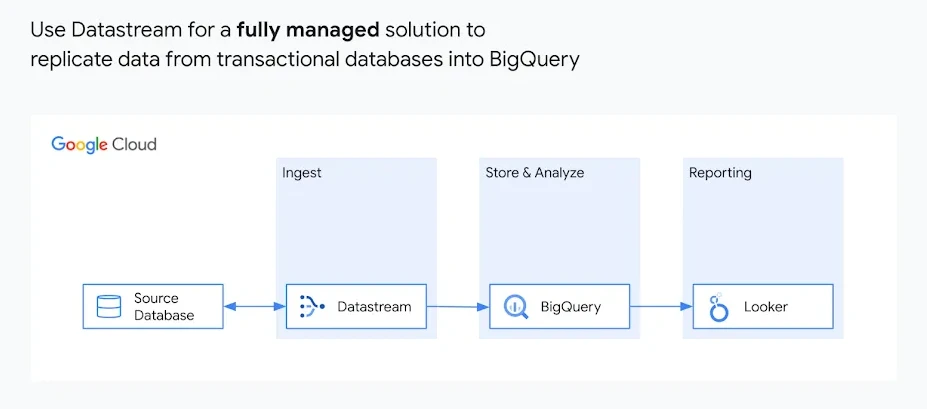
1. Go to Google cloud console, Search for the Datastream and enable API features
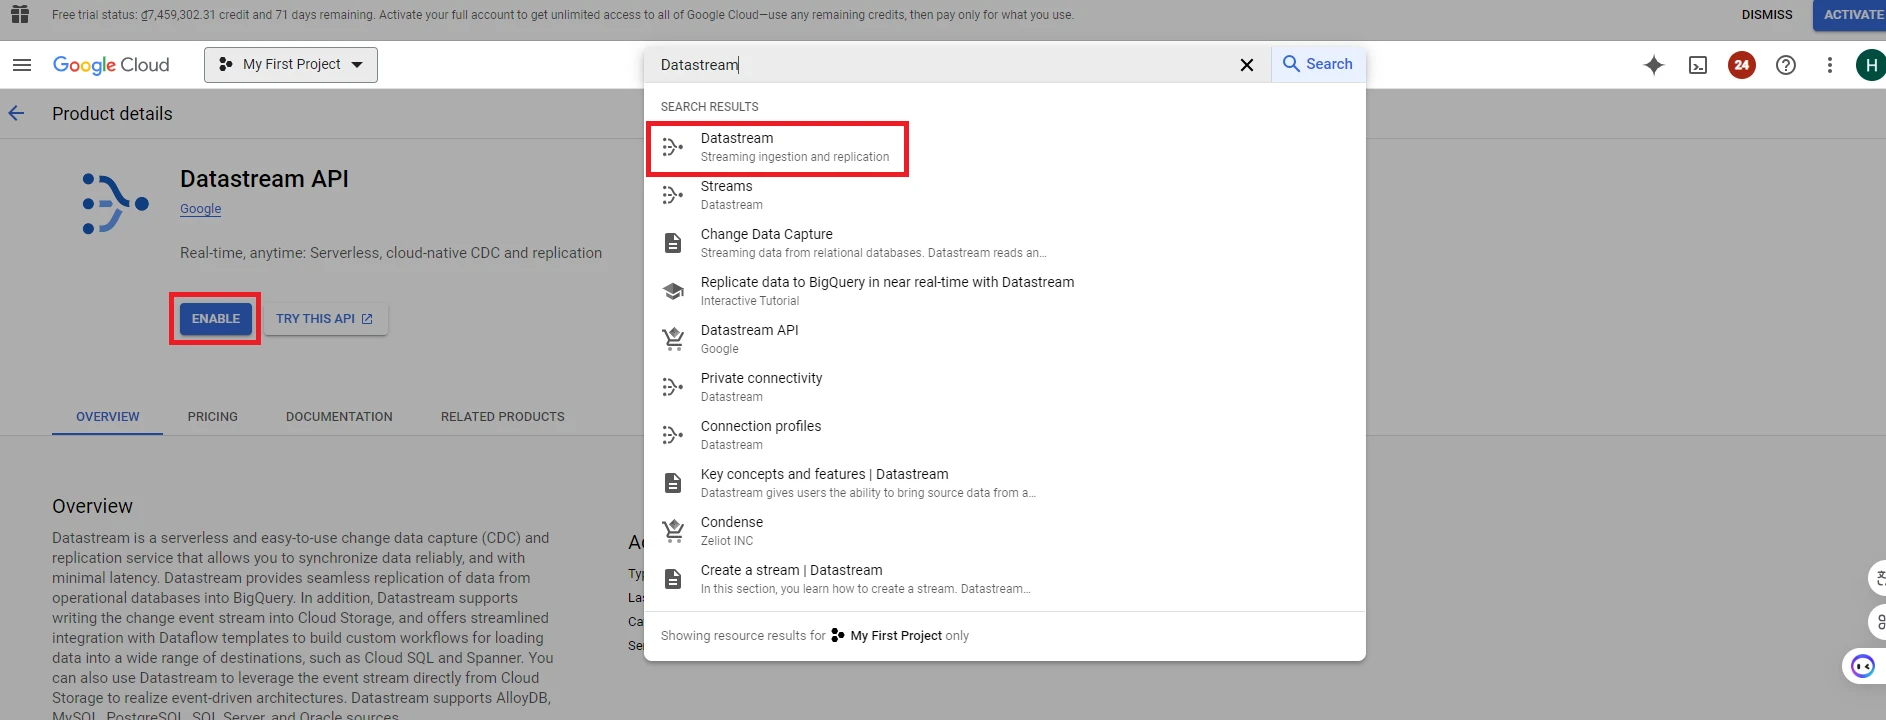
2. Create Stream

3. Fill the information in the ‘Create stream’ table:
– Stream name: Set a name for your stream
– Region: Select a region
– Source Type: Choose one of these source types: Oracle, MySQL, Postgre, SQL Server
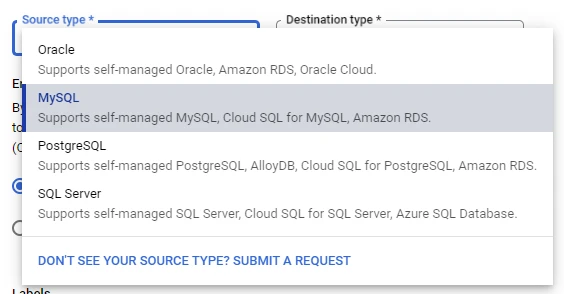
– Destination Type: Choose one of these destination types: Cloud storage, BigQuery
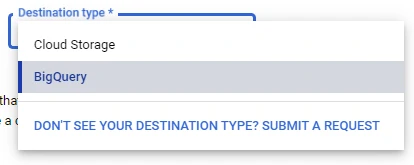
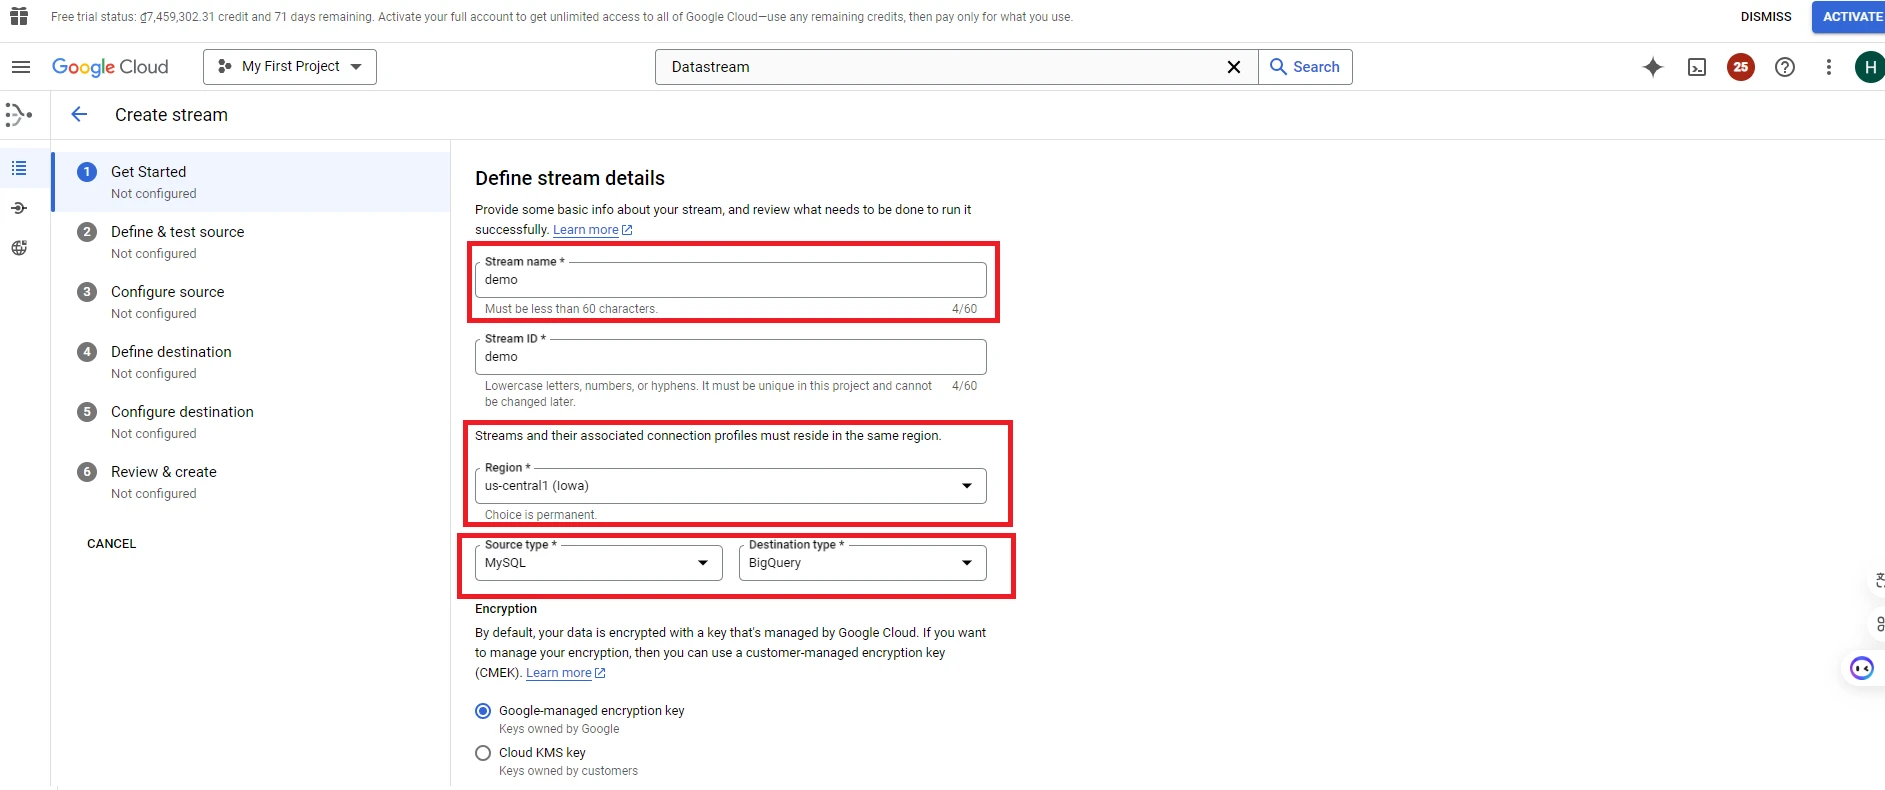
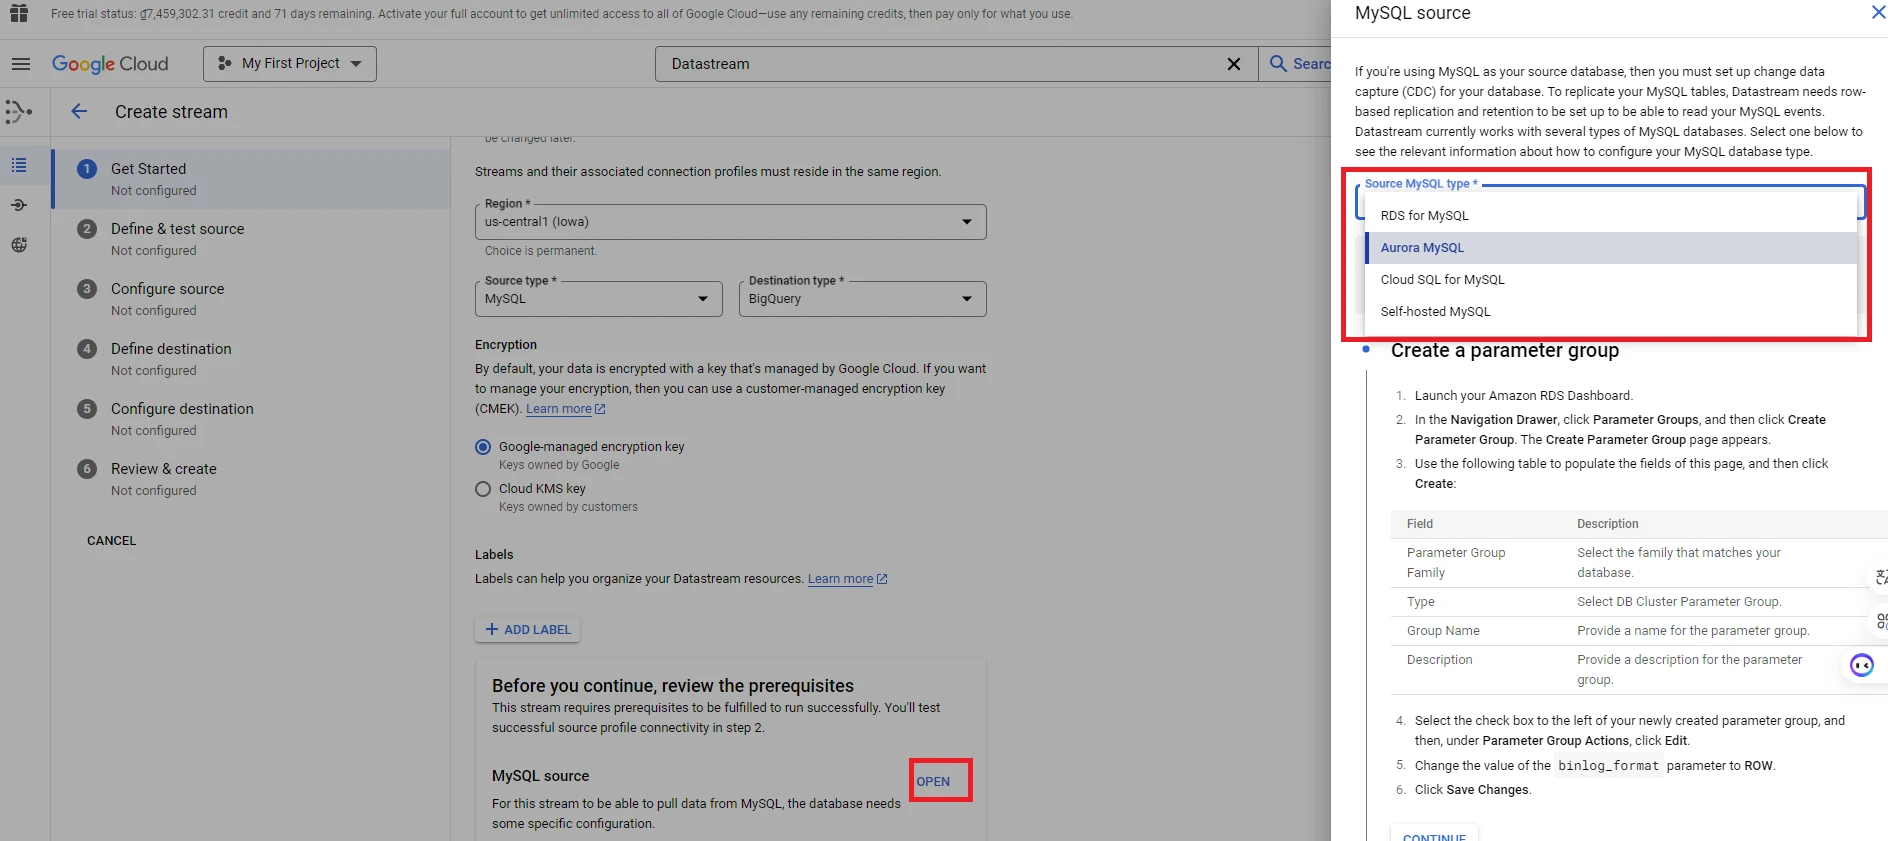
4. For Datastream to pull data from the Database, the Database needs a few configurations. Depending on the type of Database you are using, follow the relevant configuration instructions. (In this guide, we will use Cloud SQL for MySQL).
5. Click ‘Next’ to go to the next form. In the following form, you’ll need to enter the information to create a connection profile

6. Fill the information in the‘Create MySQL connection profile’ table:
– Connection profile name: The name of connection profile
– Hostname or IP: Hostname or IP address of your database.
– Port: Port database you’re using
– Username: The login name for the database account
– Password: The password for the account
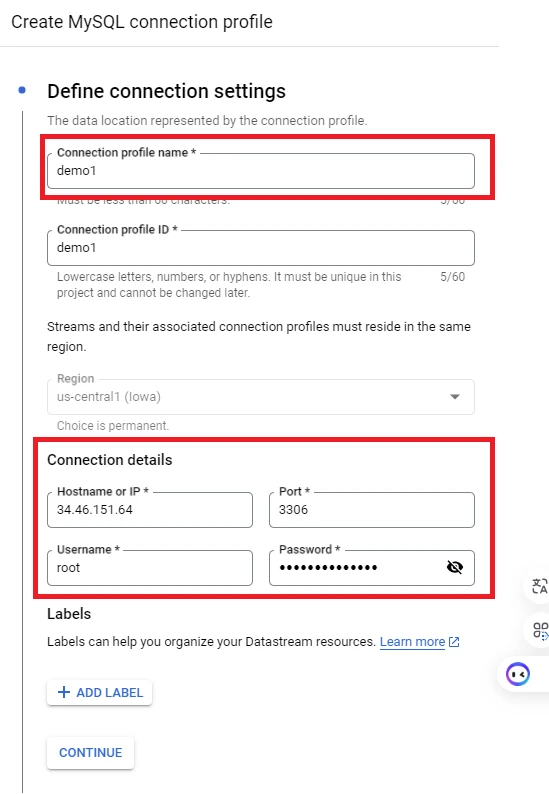
7. Next, you can configure the security settings for your stream. In this guide, we will use the default settings. The IP addresses listed below will be accessing your database, so make sure to configure your database to allow connections from these IPs.
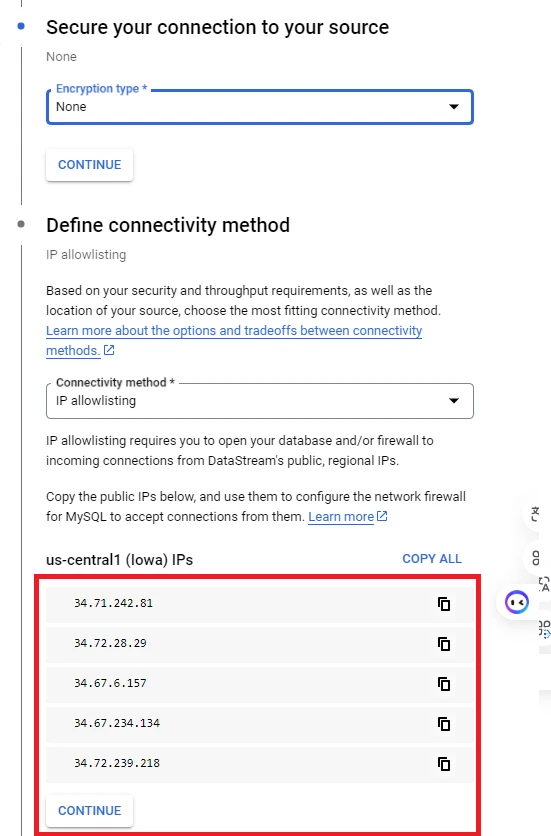
8. Click ‘Run test’ and then click ‘Continue’
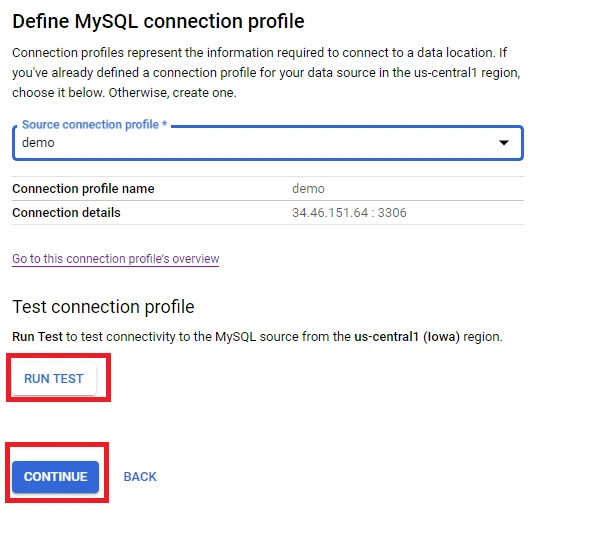
9. Fill the information in the ‘Configure stream source’ table:
– Objects to include:
+ All tables from all schemas: Stream all tables and all schemas in the Database
+ Specific schemas and tables: Select tables and schemas you want to stream
+ Custom: Similar to specific schemas and tables, but using text instead of checkboxes to select
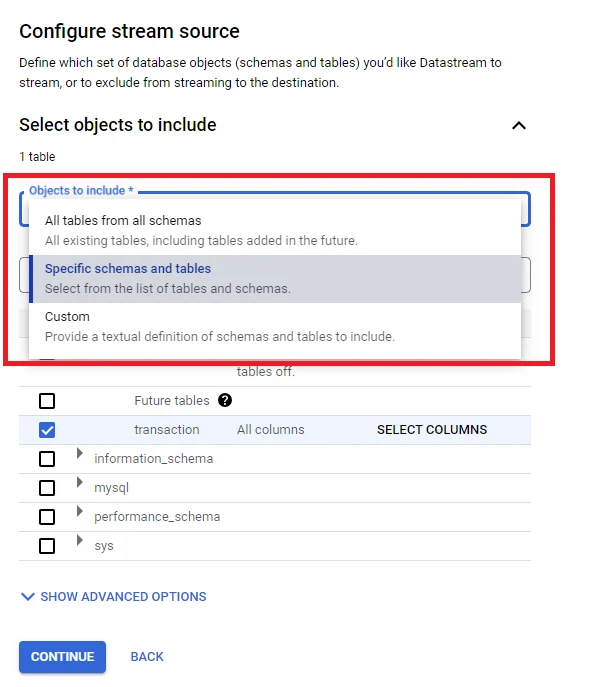
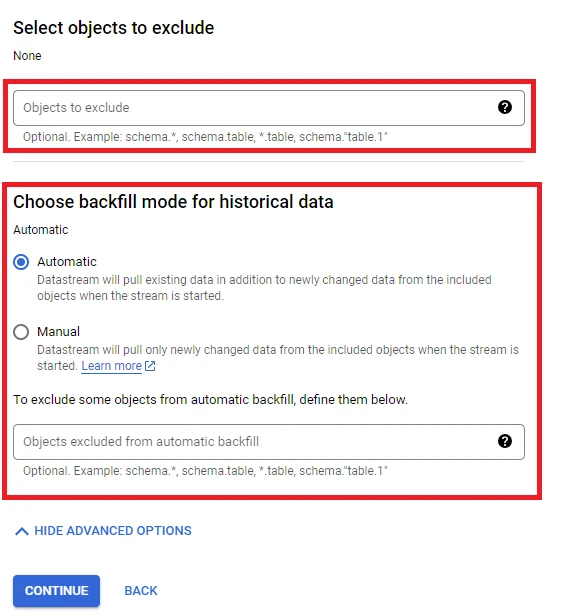
10. Select ‘SHOW ADVANCED OPTIONS’, enter the information in this table:
– Objects to exclude: Choose the data you do not want to stream: schema, table, or column.
– Choose backfill mode for historical data: Select the mode for data that existed before using the stream:
+ Automatic: Stream all existing records in the Database and any records created after the stream is started
+ Manual: Only stream records created after starting the stream
11. Click CONTINUE, fill the information in the ‘CREATE CONNECTION PROFILE’ table
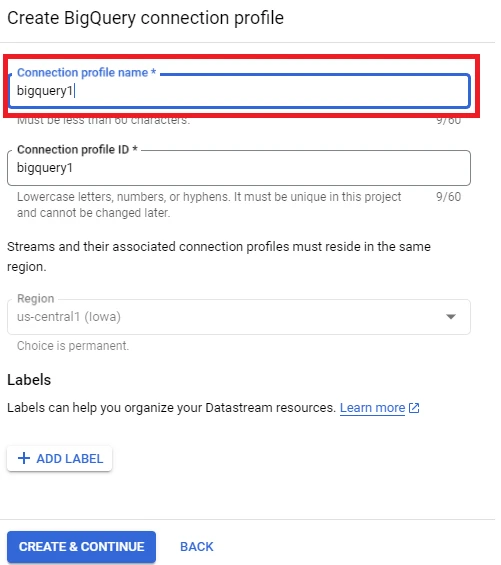
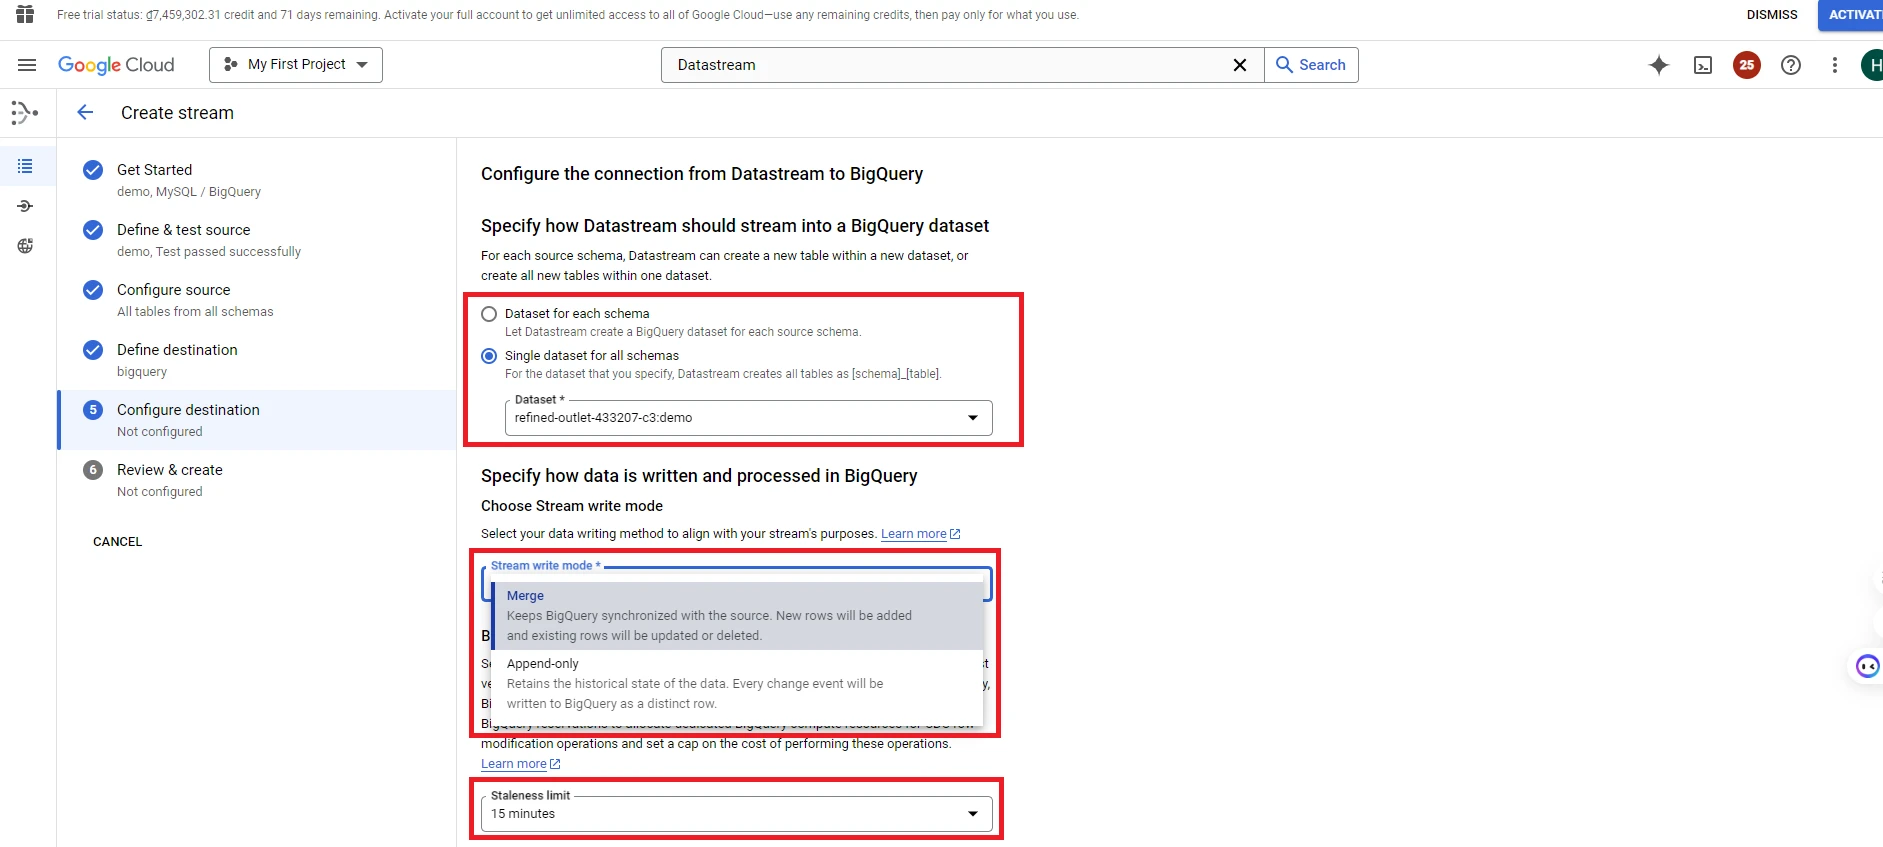
12. Select CONTINUE, enter the information in the ‘Configure the connection from Datastream to BigQuery’ table:
– Specify how Datastream should stream into a BigQuery dataset:
+ Dataset for each schema: Each schema will stream into its own dataset
+ Single dataset for all schemas: All schemas will stream into a single dataset
– Stream write mode:
+ Merge: Synchronize records with the database. We can add, update, or delete records according to the database
+ Append-only: Each event (insert, update, delete) in the database will be recorded in BigQuery
– Stateleness limit: Scheduled update time for data from the database to BigQuery
13. Review the information, select run validation and create stream
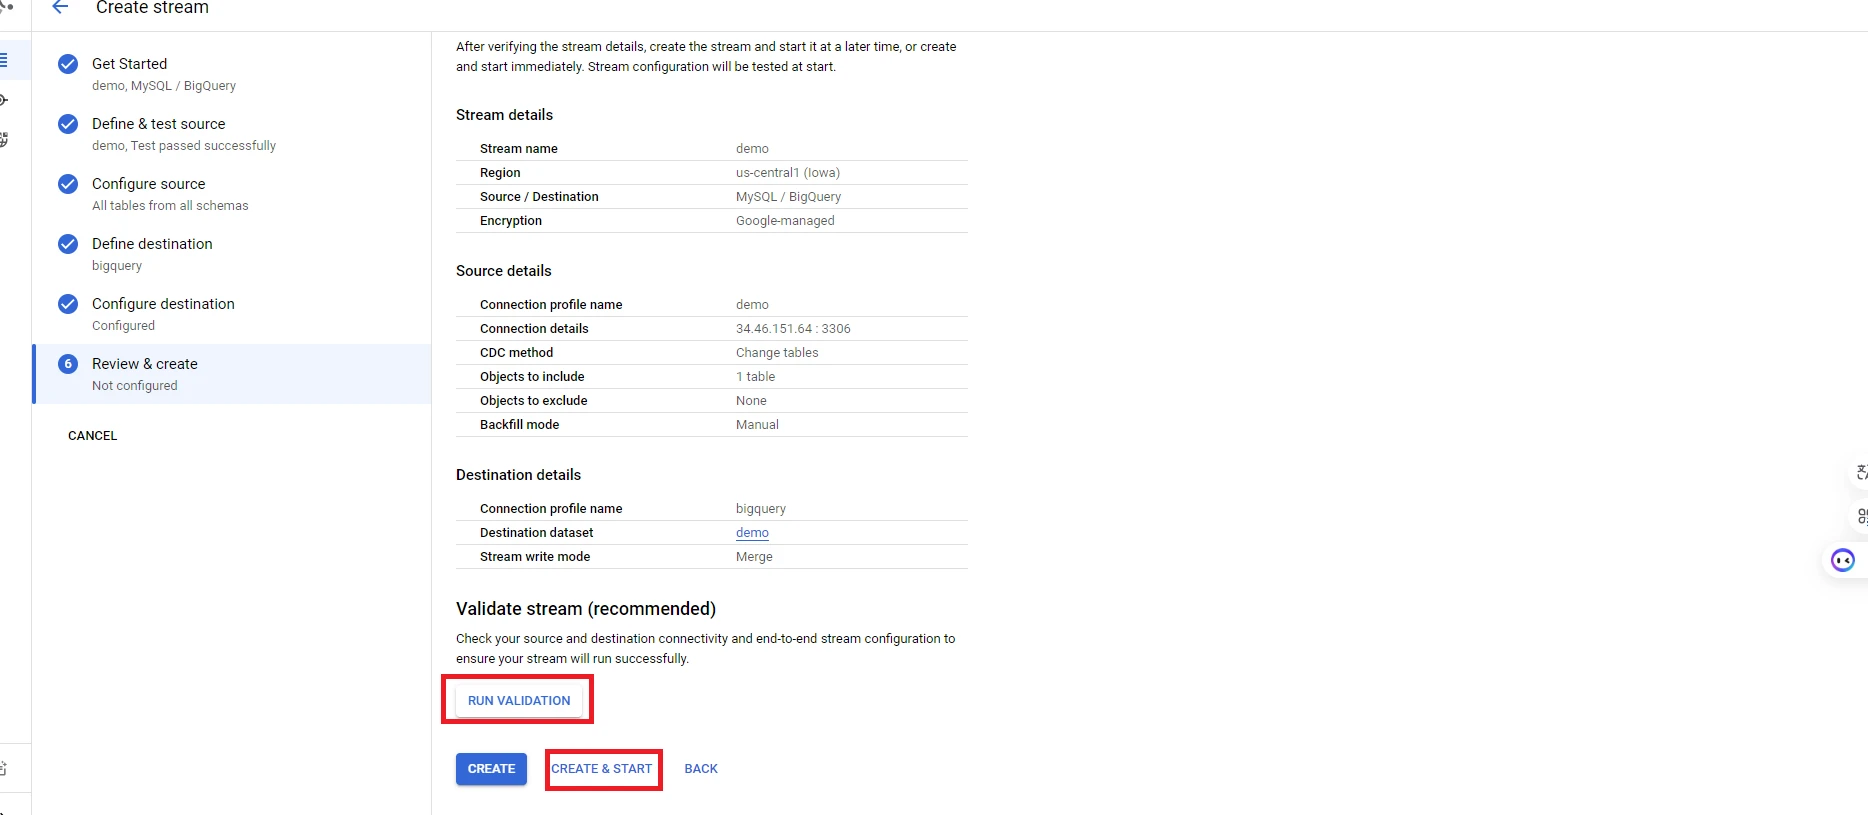
You have completed the setup of Datastream to transfer data from the Database to BigQuery. Next, we will guide you on how to use Scheduled Queries to generate periodic reports.
Using Scheduled Queries to generate periodic reports
1. Go to the BigQuery page and add a Report table

2. Turn on the Query tab to write the query for generating reports

3. After completing, click ‘SCHEDULE’ section to schedule the periodic execution of the query

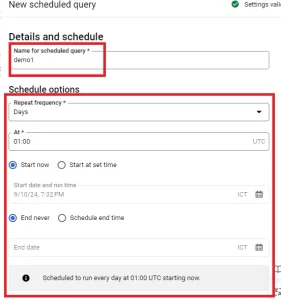
4. Fill the information in the ‘New scheduled query’ table:
– Name for scheduled query: Enter scheduled query name
– Schedule options: Set the frequency for executing the query: hourly, daily, weekly, etc., along with other related options
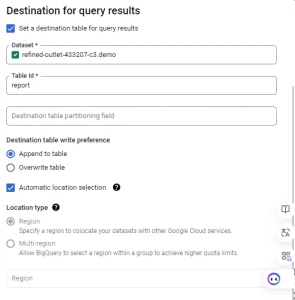
– Destination for query results:
+ Dataset: Select the Dataset where the aggregated data will be inserted
+ TableId: Choose the table that will store the aggregated data
+ Destination table write preference:
- Append to table: New data will be inserted into the table
- Overwrite table: New data will overwrite the existing table
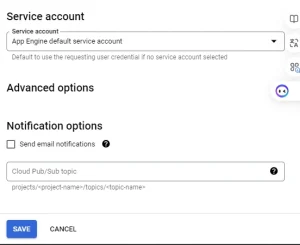
– Service account: Select the account that will execute the scheduled query
– Notification option: Send notifications to the account if the scheduled query fails to execute
You have now completed the setup of Scheduled Query to generate periodic reports


